
 公有云部署流程
# 1. 概述
- 目标:本文档描述如何将 iMOM 产品部署到华为云的 CCE(Cloud Container Engine)中,并通过 Helm 模板部署相关中间件(Nacos、PowerJob、RocketMQ)。后端数据库使用华为云 iDME 服务、 RDS 服务(MySQL)和 Redis 服务。
- 适用范围:适用于需要将 iMOM 产品部署到华为云 CCE 上的用户。
- 前提条件:
- 拥有华为云账户和操作权限。
- 已完成 iMOM 产品的容器化,并生成 Docker 镜像。
- 华为云账号已购买 CCE、 iDME、 MySQL、Redis、OBS、ELB 等产品。
# 2. 部署准备
# 2.1 基础设施准备
- 华为云账号:确保已注册并配置了华为云账户,拥有 CCE 和相关资源的操作权限。
- VPC 网络配置:
- 创建虚拟私有云(VPC)和子网,确保 CCE 集群和其他云资源(如数据库、缓存服务)位于相同的 VPC 中。
- 配置安全组,确保 CCE 集群和外部访问通信正常。
- ECS 实例:
- 配置 ECS 实例作为 CCE 集群节点,确保具备足够的计算资源(CPU、内存)。
- 云硬盘(如云存储)配置:准备好需要的持久化存储,确保数据库、缓存等服务的数据持久化。
# 2.2 华为云CCE集群配置
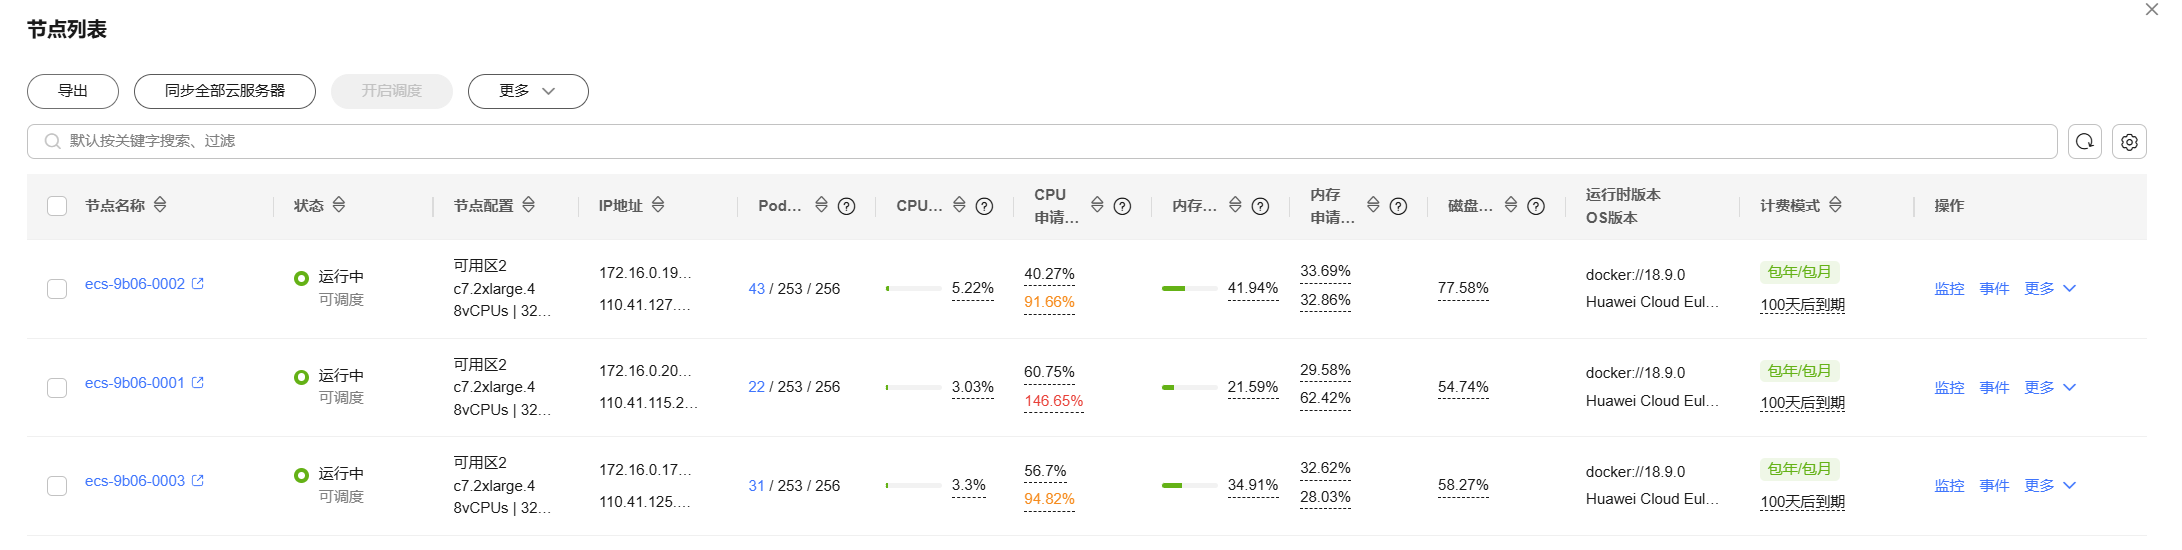
- 在华为云CCE控制台确认节点池里的已纳管ECS节点,状态为运行中。
- 在CCE集群中创建命名空间,并配置命名空间权限。
- 配置 CCE 集群的网络插件以及负载均衡服务(ELB),并做好授权。
# 2.3 华为云iDME服务配置
- 查看华为官方文档 (opens new window) 根据提示创建应用
- 如iDME与CCE集群在同一VPC下,选择开启内网访问。
- 如iDME与CCE集群不在同一VPC下,则需绑定弹性公网IP,并挂载开启公网访问。
# 3. 中间件部署
# 3.1 Nacos部署
Nacos 是一个开源的服务发现、配置管理和服务管理平台,广泛用于微服务架构中。
- 使用 Helm 部署 Nacos:
- 下载 Nacos Helm模板 到本地。
- 上传模板到 CCE 集群。
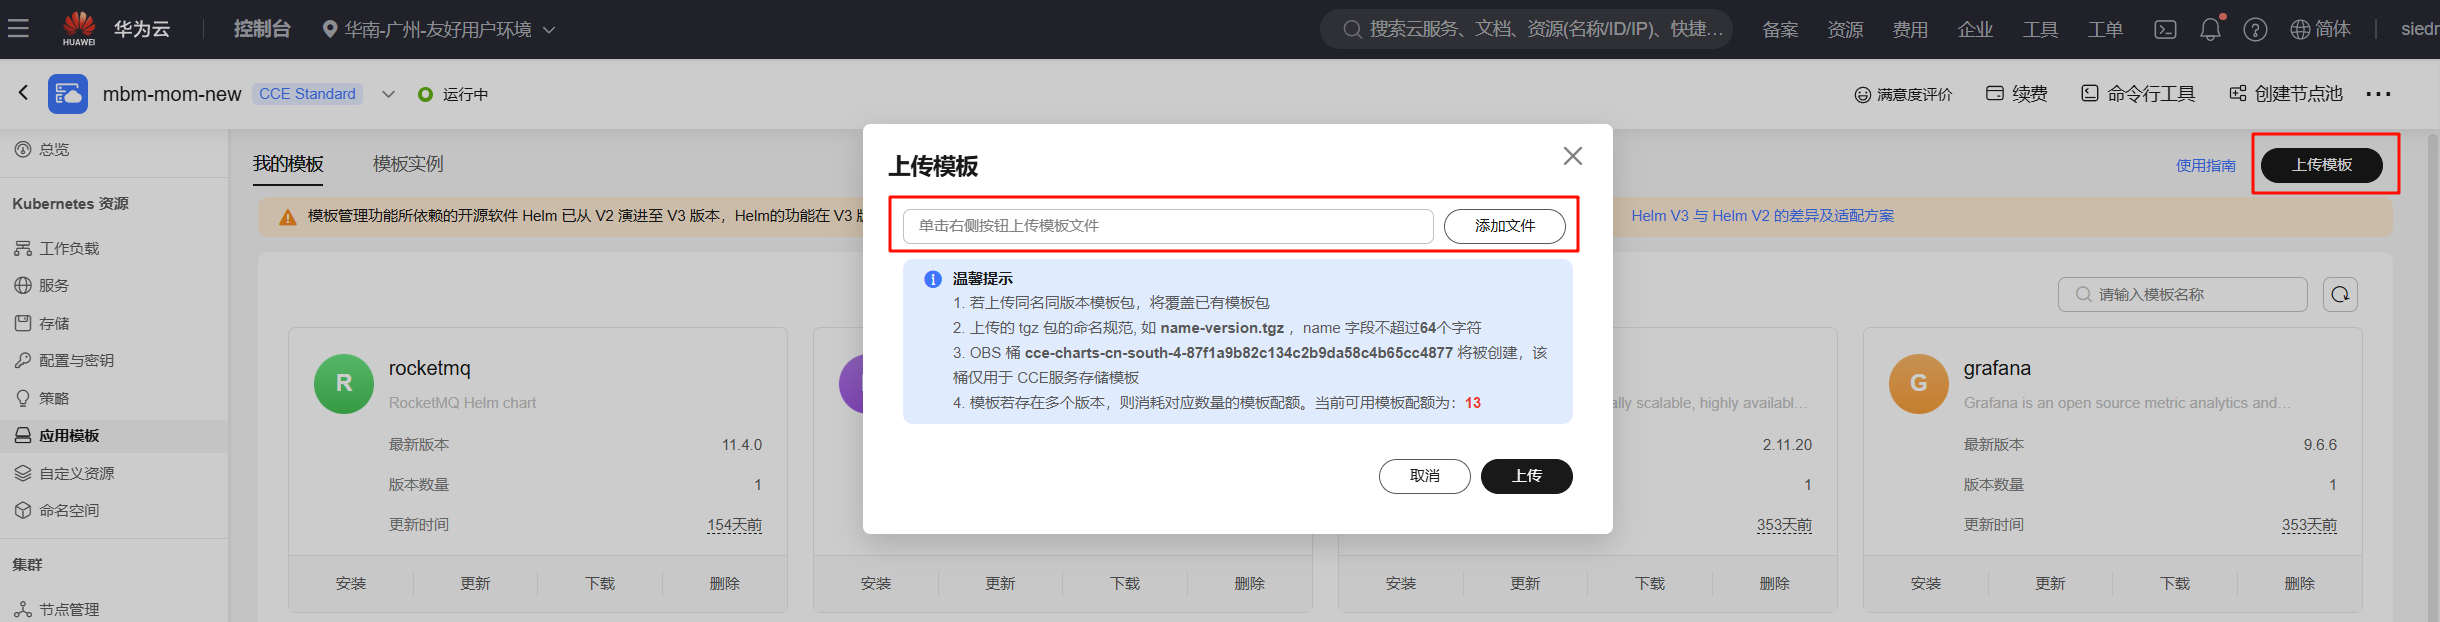
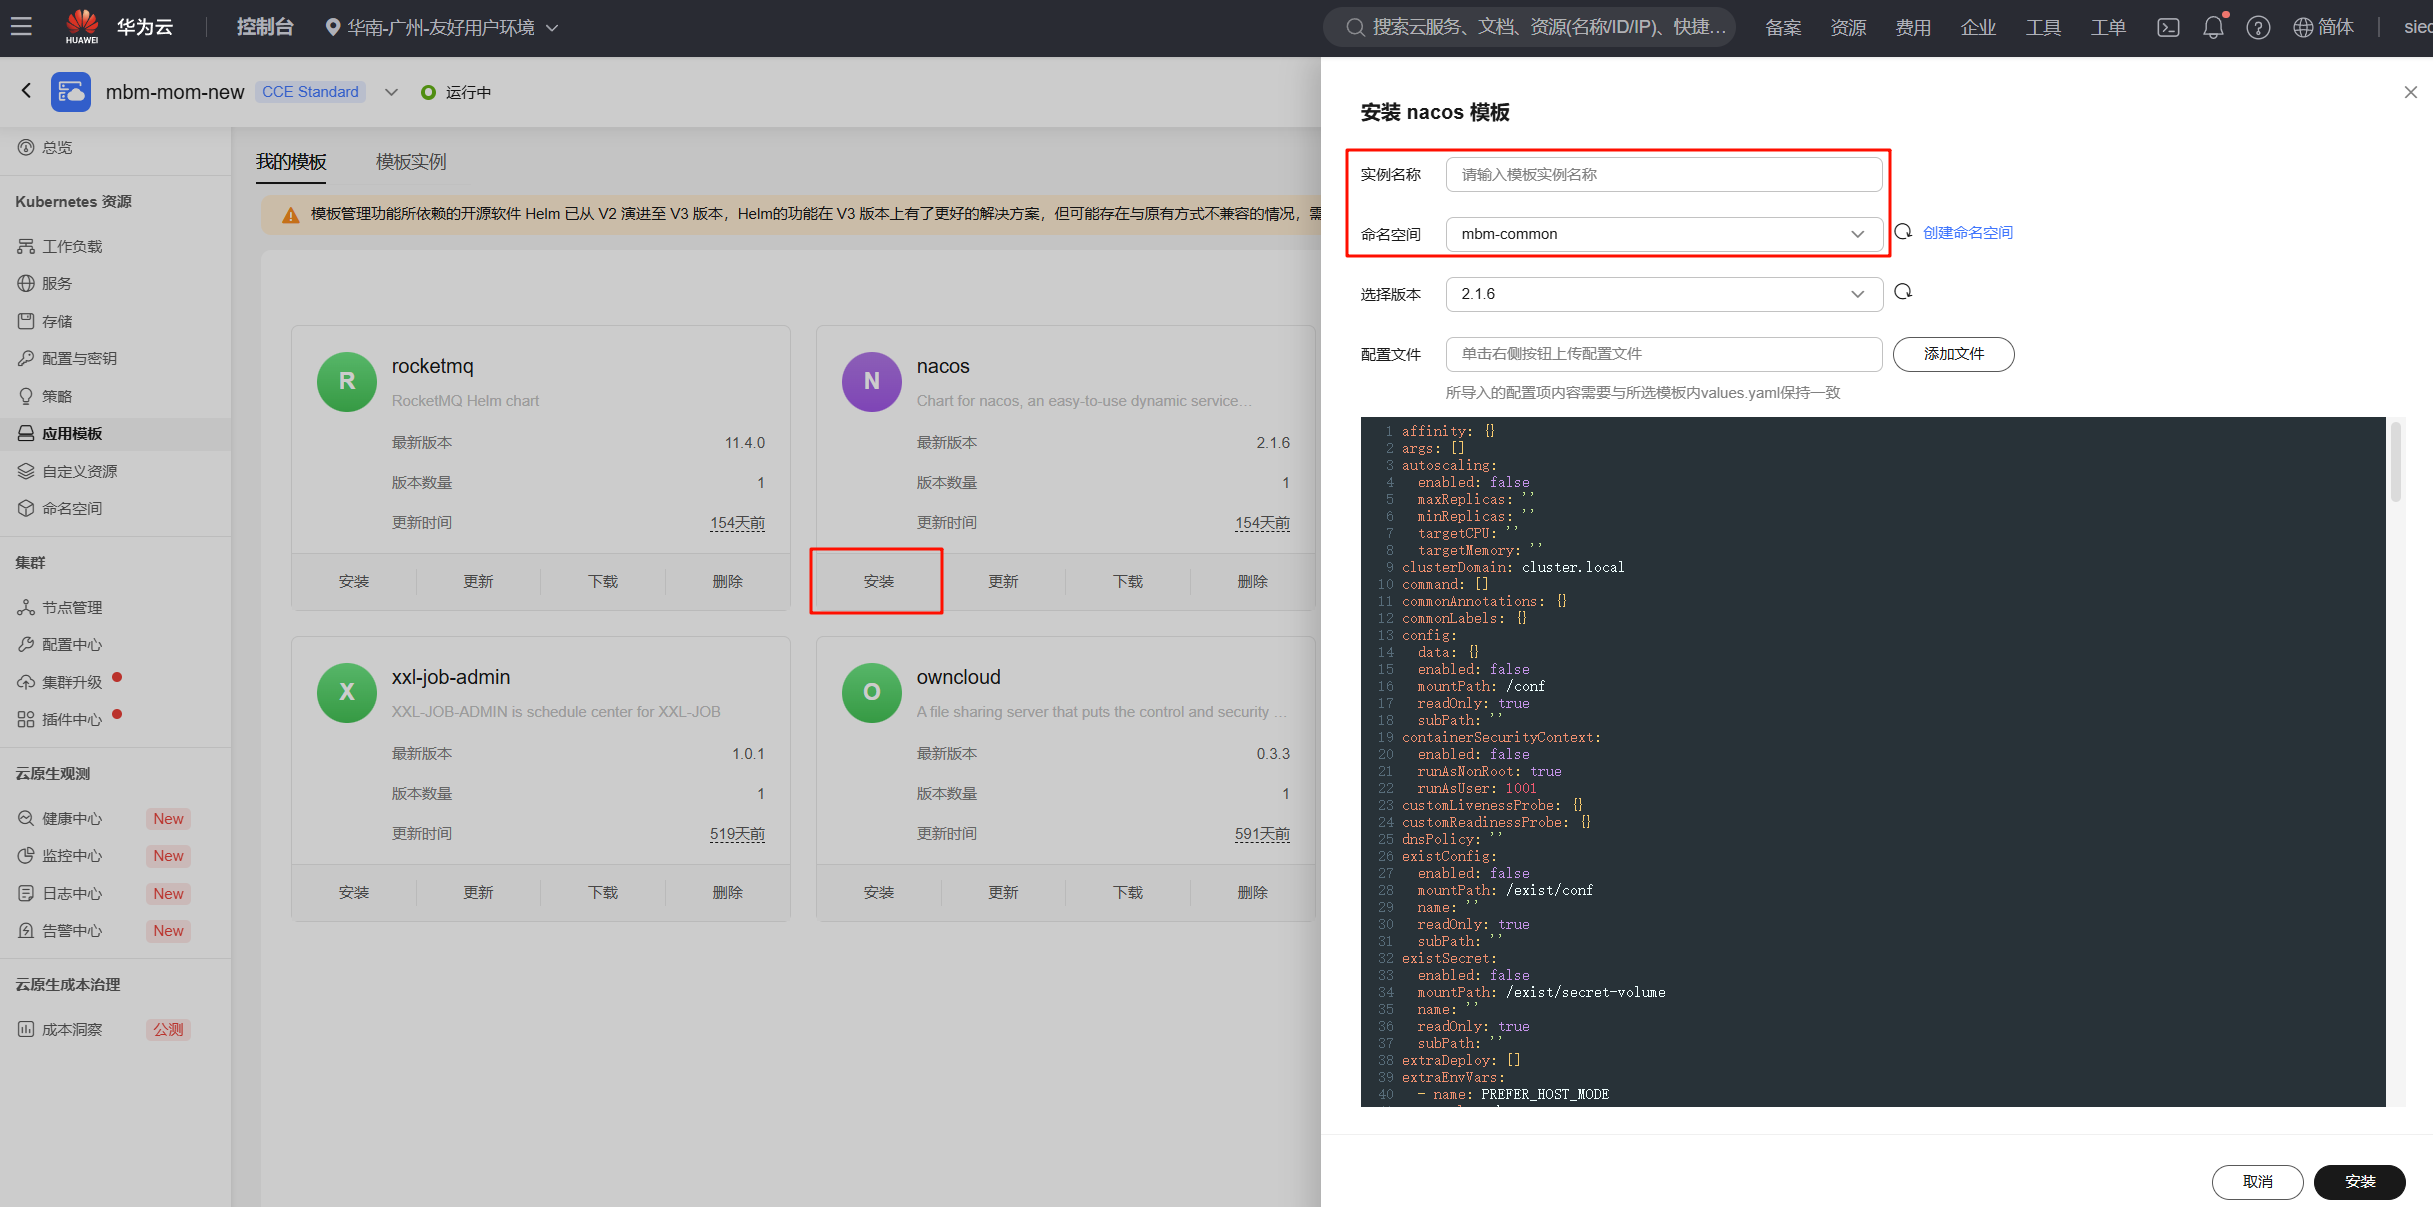
- 上传后点击安装Nacos,填写实例名称及选择命名空间。
- 修改部署
values.yaml脚本的mysql节点
mysql:
  enabled: false  # 关闭内置mysql
  external:
    mysqlDatabase: {RDS数据库名}
    mysqlMasterHost: {RDS连接地址}
    mysqlMasterPassword: {RDS数据库密码}
    mysqlMasterPort: {RDS数据库端口}
    mysqlMasterUser: {RDS数据库用户名}
    mysqlSlaveHost: {RDS数据库从库地址,如果是单机版填主库地址}
    mysqlSlavePort: {RDS数据库从库端口,如果是单机版填主库端口}
1
2
3
4
5
6
7
8
9
10- 填写其他参数,如
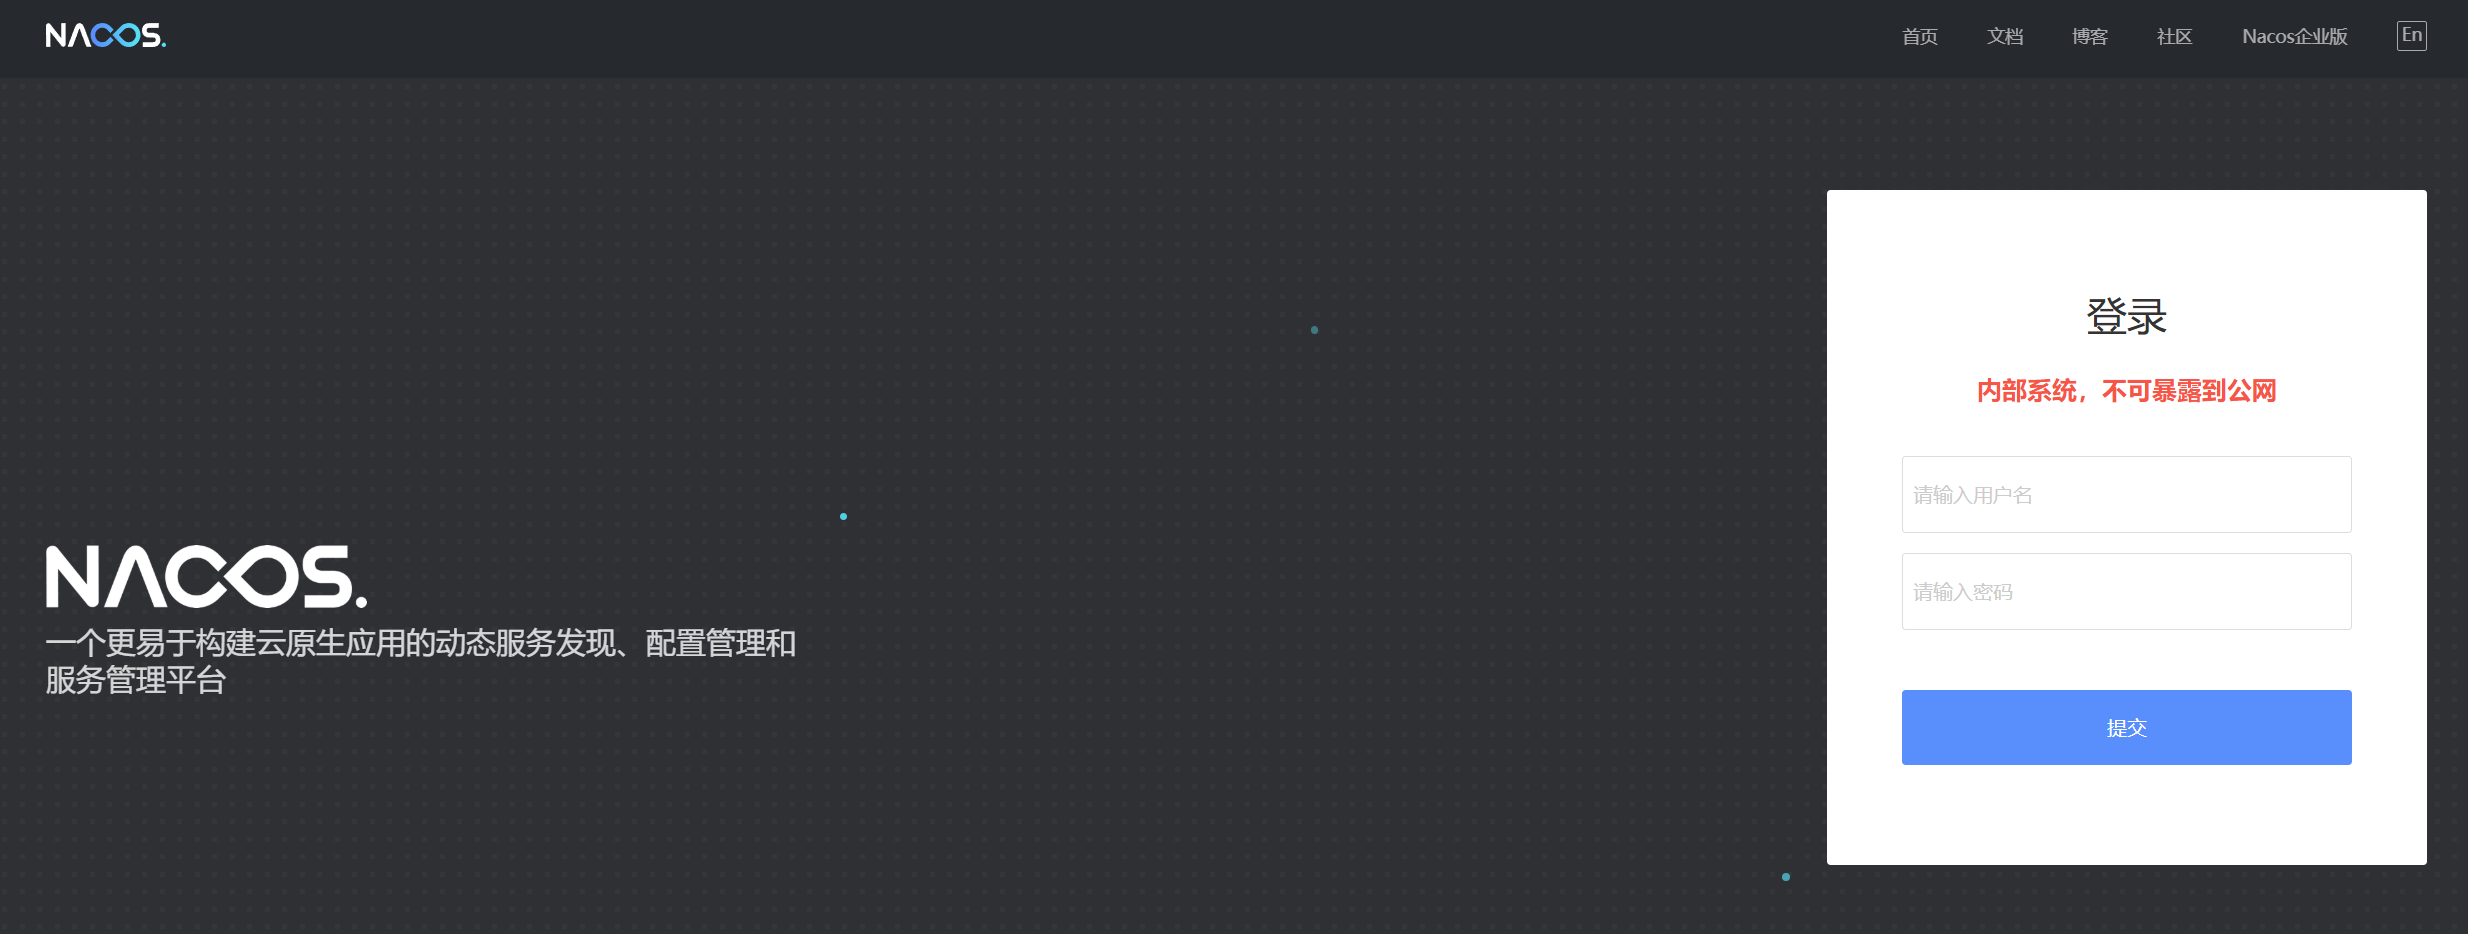
imagePullSecrets等,点击安装。 - 验证 Nacos 服务,浏览器打开 http://{Nacos服务IP}:{Nacos服务端口}/nacos,如果出现如下页面,则表示 Nacos 部署成功。
# 3.2 PowerJob部署
PowerJob 是一个分布式任务调度平台,适用于微服务架构中的任务调度和管理。
- 创建PowerJob配置文件
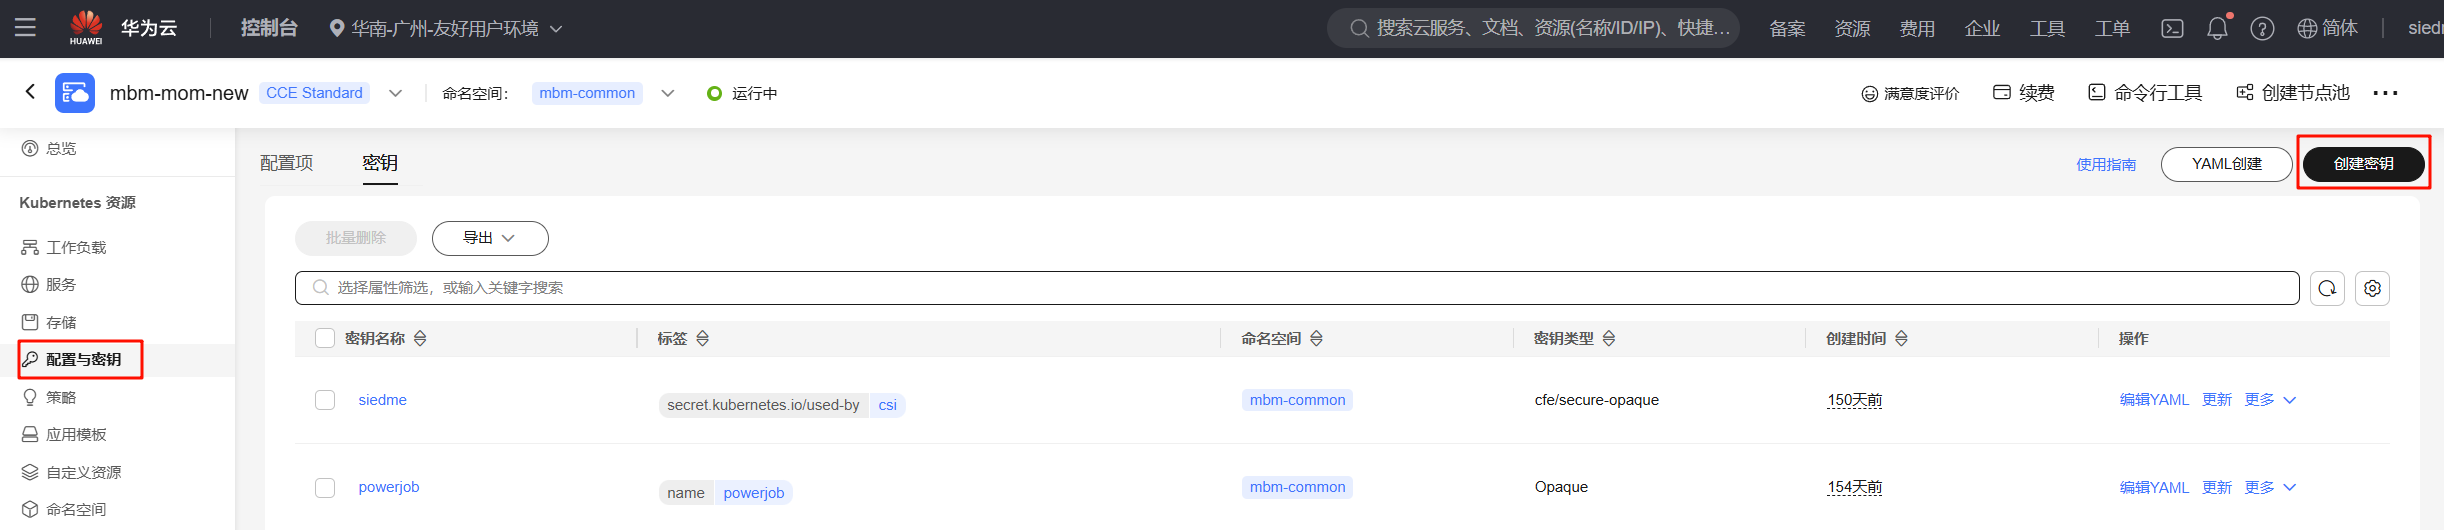
- 添加键为
PARAMS的密钥数据 - 根据以下配置修改数据库信息后,添加密钥值
--spring.profiles.active=daily
--spring.datasource.core.driver-class-name=com.mysql.cj.jdbc.Driver
--spring.datasource.core.jdbc-url=jdbc:mysql://172.16.0.83:3306/powerjob_new?useUnicode=true&characterEncoding=UTF-8&serverTimezone=Asia/Shanghai  # 数据库连接地址
--spring.datasource.core.username=powerjob  # 数据库用户名
--spring.datasource.core.password=Powerjob123456  # 数据库密码
--oms.storage.dfs.mysql_series.driver=com.mysql.cj.jdbc.Driver
--oms.storage.dfs.mysql_series.url=jdbc:mysql://172.16.0.83:3306/powerjob_new?useUnicode=true&characterEncoding=UTF-8&serverTimezone=Asia/Shanghai  # 数据库连接地址
--oms.storage.dfs.mysql_series.username=powerjob  # 数据库用户名
--oms.storage.dfs.mysql_series.password=Powerjob123456  # 数据库密码
--oms.storage.dfs.mysql_series.auto_create_table=true
--oms.alarm.ding.app-key=
--oms.alarm.ding.app-secret=
--oms.alarm.ding.agent-id=
1
2
3
4
5
6
7
8
9
10
11
12
13
2
3
4
5
6
7
8
9
10
11
12
13
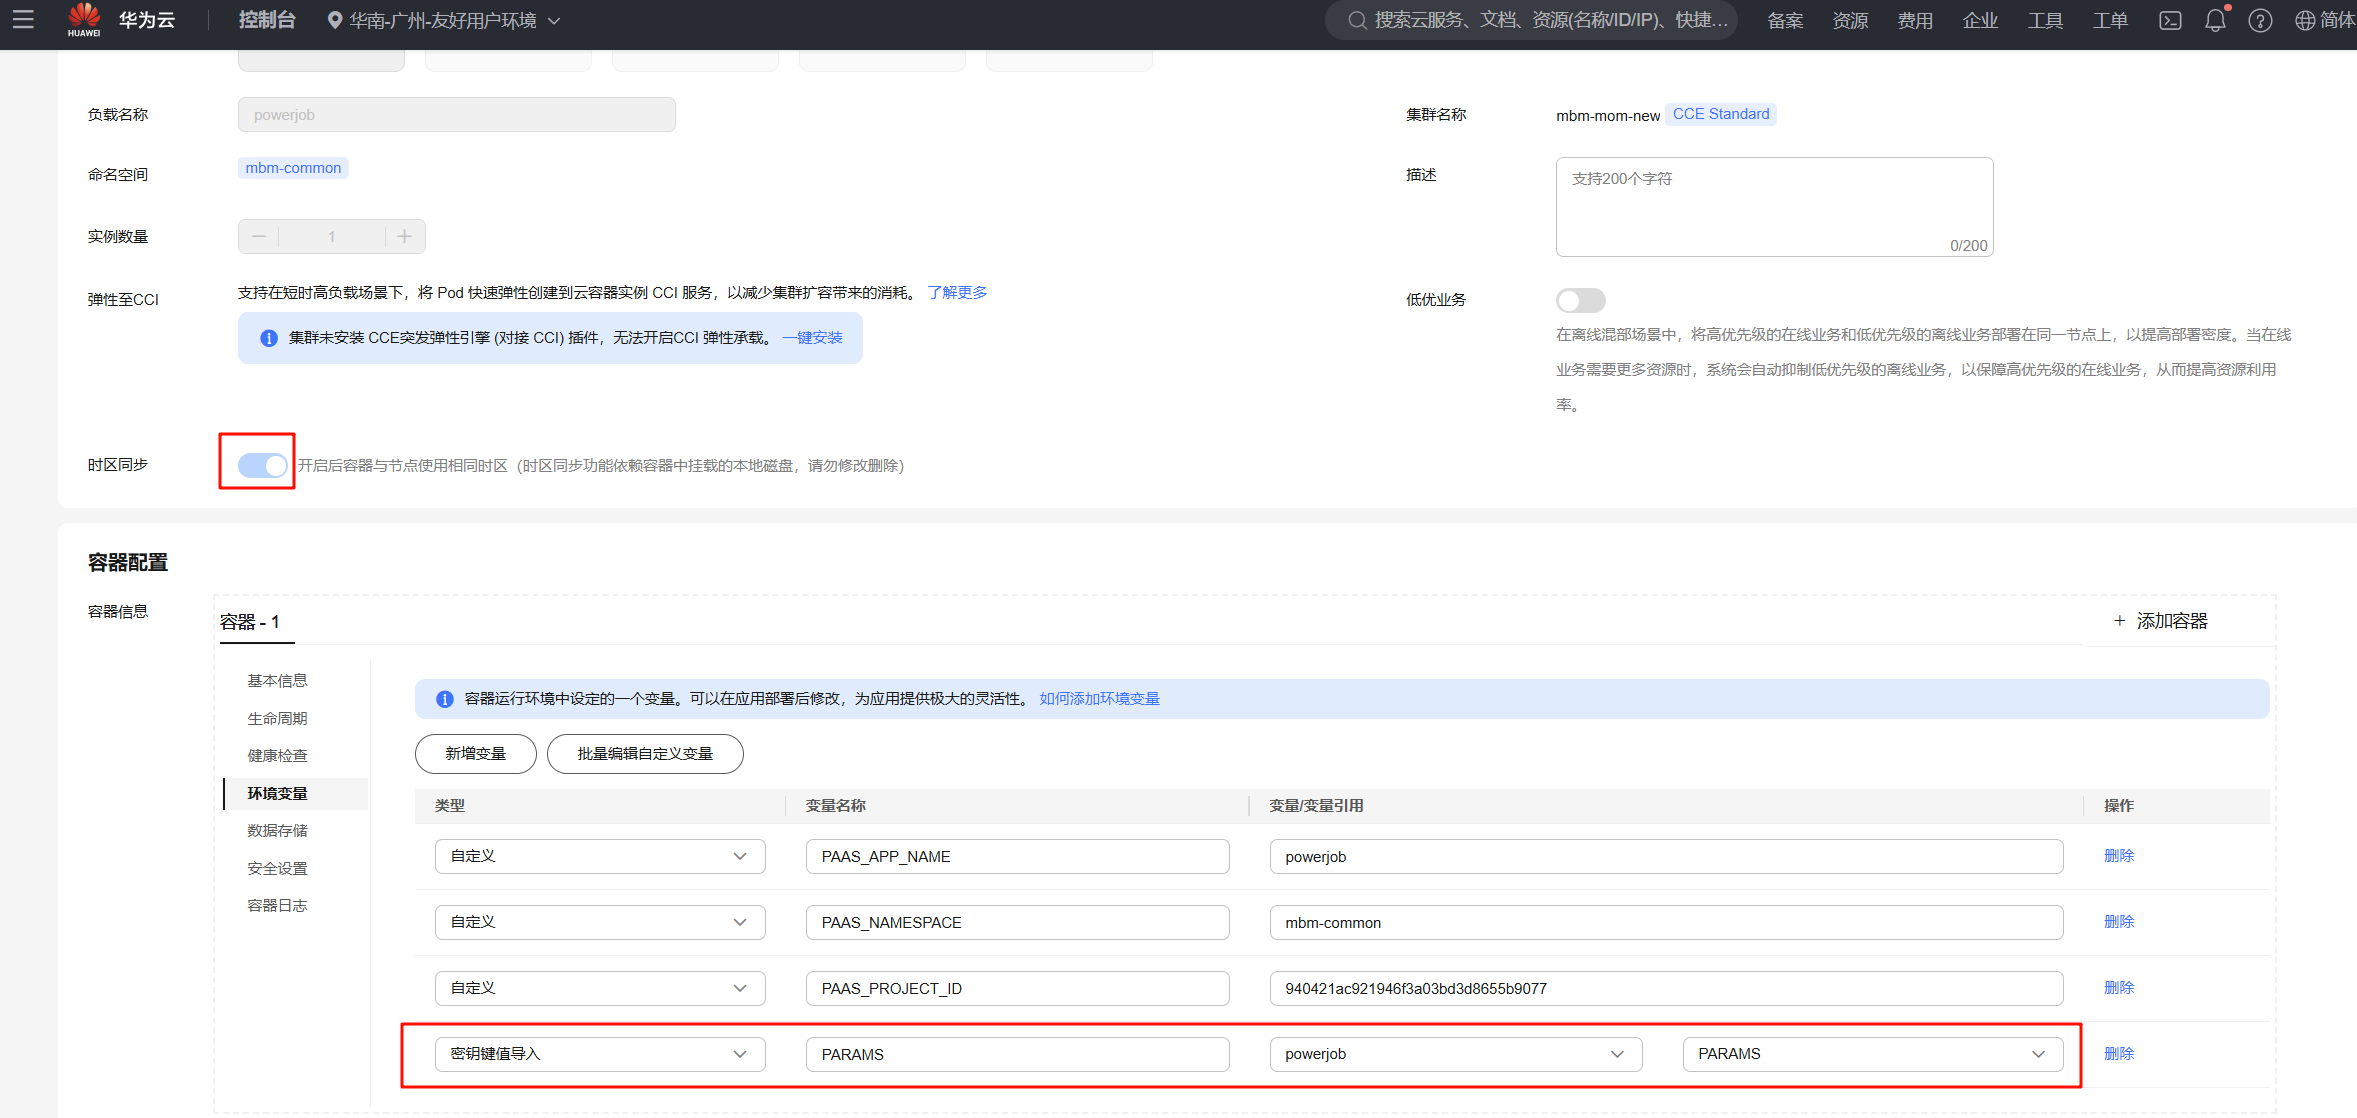
- 创建PowerJob工作负载

- 需开启时区同步,并在环境变量添加刚才新建的密钥项
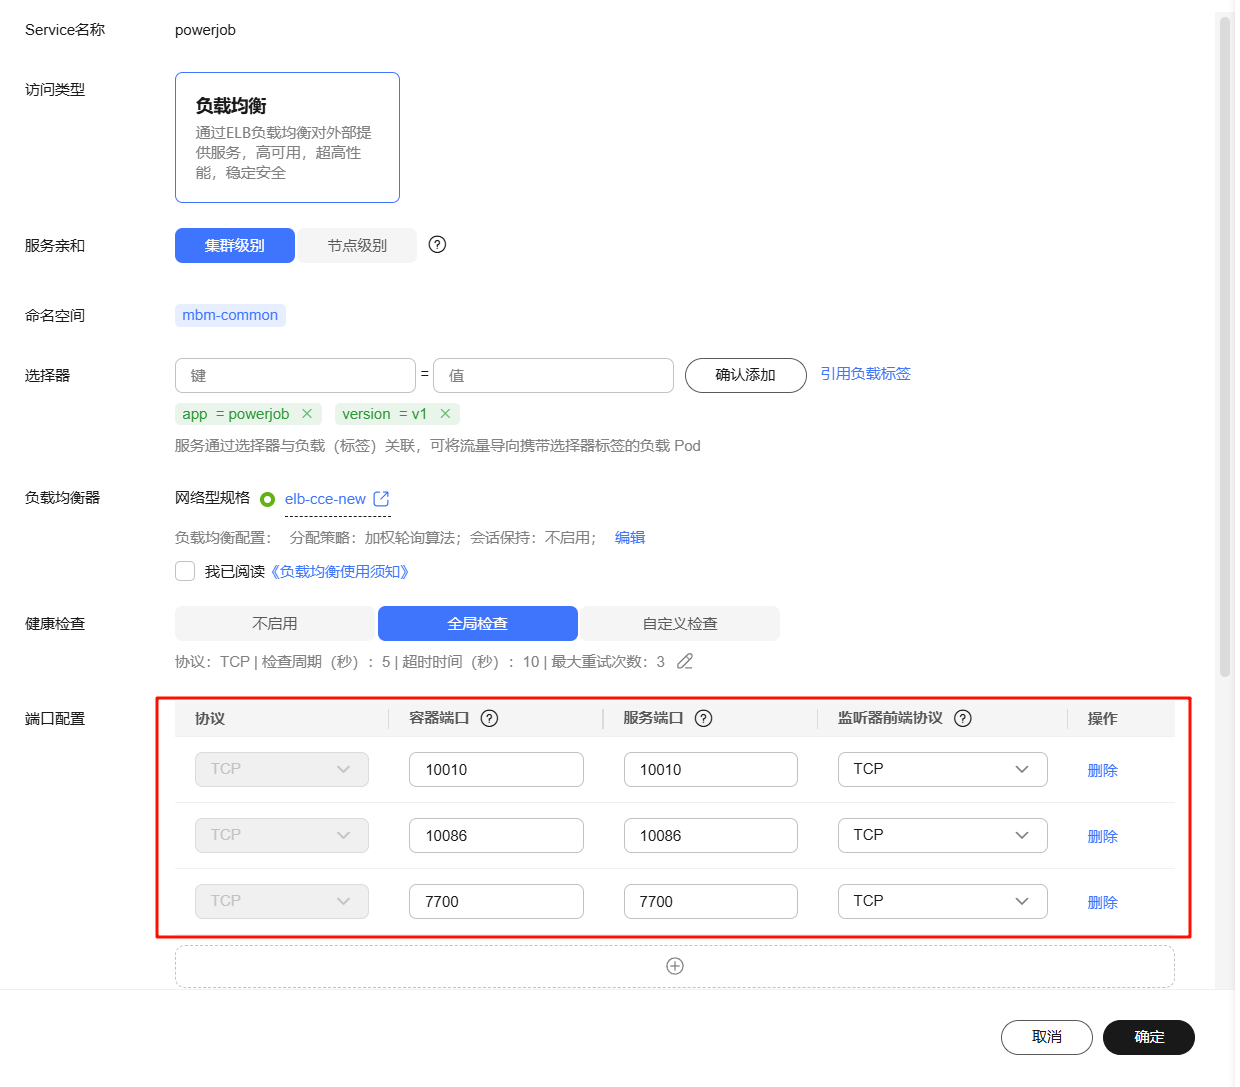
- 创建PowerJob服务,端口号可参考下图配置
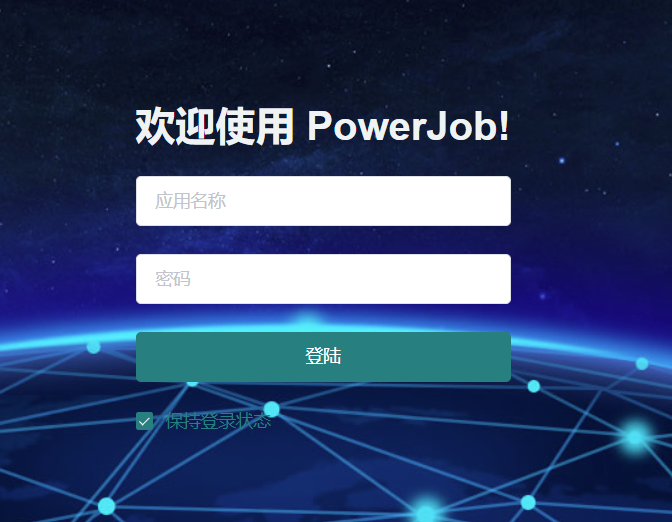
- 验证 PowerJob 服务,浏览器打开 http://{PowerJob服务IP}:{PowerJob服务端口,默认是7700}/,如果出现如下页面,则表示 PowerJob 部署成功。
# 3.3 RocketMQ部署
RocketMQ 是一款高性能、高可扩展的消息队列,适用于微服务架构中的异步消息传递。
- 使用 Helm 部署 RocketMQ:
- 下载 RocketMQ Helm模板 到本地。
- 上传模板到 CCE 集群。
- 上传后点击安装RocketMQ,填写实例名称及选择命名空间。
- 修改部署
values.yaml脚本的dashboard:auth节点
dashboard:
  auth:
    enabled: true  # 开启认证
    users:
      - isAdmin: true  # 是否为管理员
        name: admin  # 管理员用户名
        password: 123456  # 管理员密码
      - name: user01  # 用户名
        password: 123456  # 密码
1
2
3
4
5
6
7
8
9- 填写其他参数,如
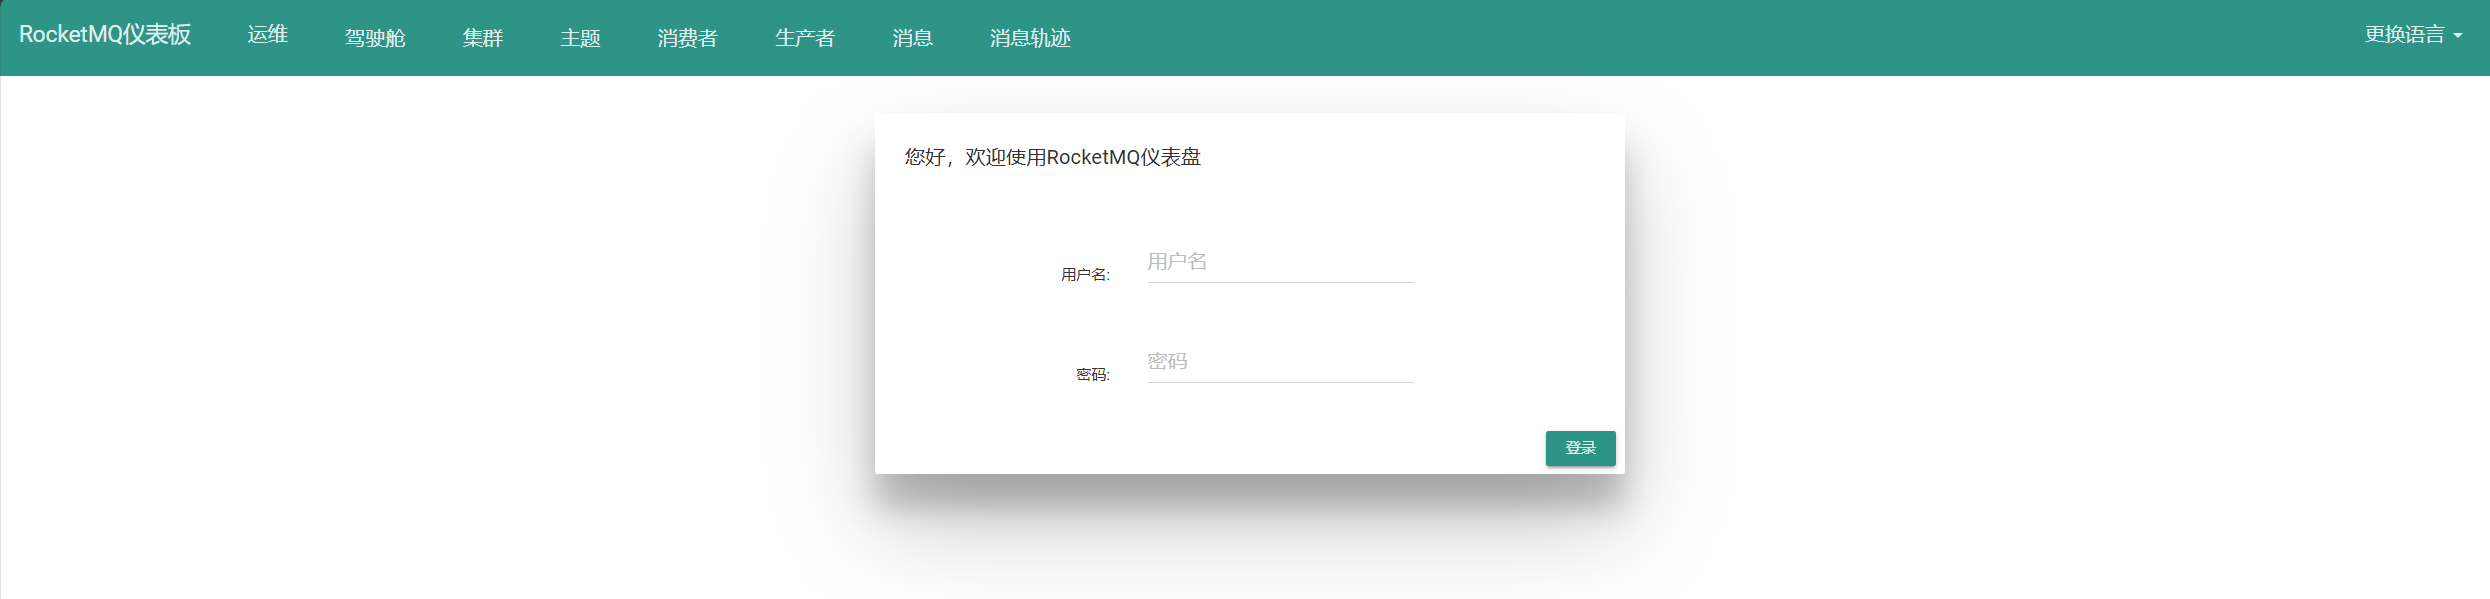
imagePullSecrets等,点击安装。 - 验证 RocketMQ 服务,浏览器打开 http://{rocketmq-dashboard服务IP}:{rocketmq-dashboard服务端口,默认是8080}/,如果出现如下页面,则表示 RocketMQ 部署成功。
# 4. 微服务部署
# 4.1 Nacos配置
进入Nacos控制台,点击左侧菜单栏
命名空间,点击新建命名空间,填写命名空间ID、命名空间名及描述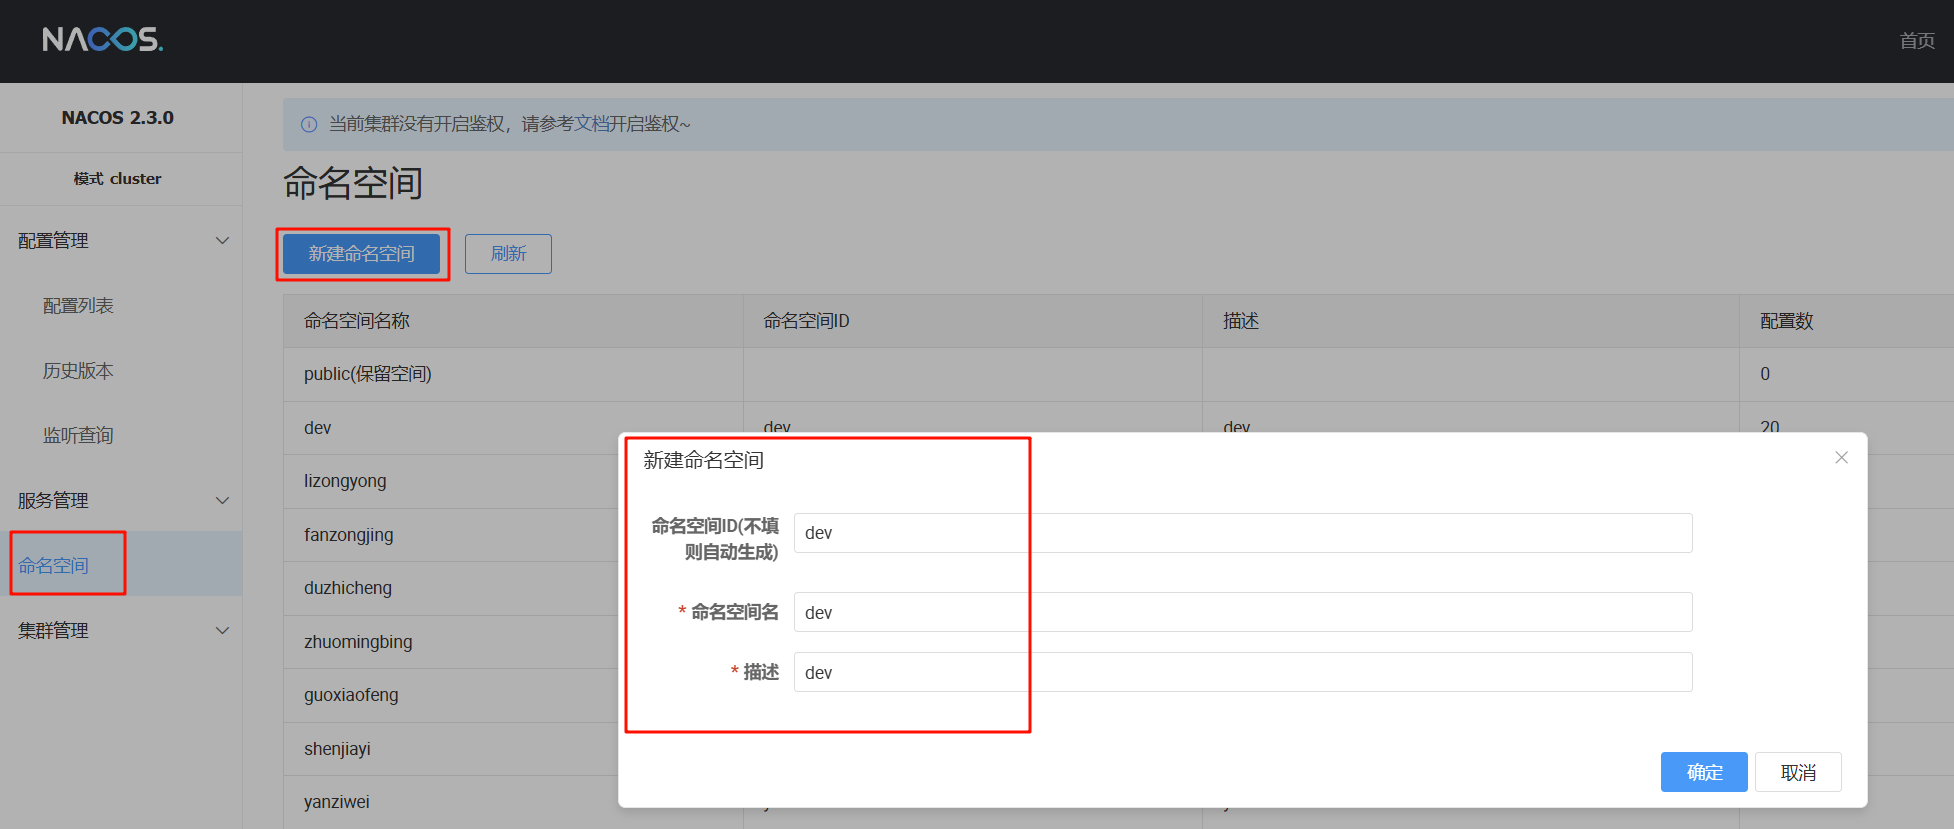
点击左侧菜单栏
配置管理,选择配置列表,点击创建配置- 创建公共配置文件
application.yml
jasypt:
  encryptor:
    password: momx
    algorithm: PBEWithMD5AndDES
    iv-generator-classname: org.jasypt.iv.NoIvGenerator

spring:
  mvc:
    pathmatch:
      matching-strategy: ant_path_matcher
  redis:
    password: 123456  # redis密码
    port: 6379  # redis端口
    host: 127.0.0.1  # redis地址
    database: 0  # redis数据库
  servlet:
    multipart:
      max-file-size: 100MB
      max-request-size: 100MB
  cloud:
    sentinel:
      eager: true
      transport:
        dashboard: mbm-sentinel:5020

management:
  endpoints:
    web:
      exposure:
        include: '*'
  endpoint:
    restart:
      enabled: true
    health:
      show-details: ALWAYS
feign:
  sentinel:
    enabled: true
  okhttp:
    enabled: true
  httpclient:
    enabled: false
  client:
    config:
      default:
        connectTimeout: 20001
        readTimeout: 20000
  compression:
    request:
      enabled: true
    response:
      enabled: true

gray:
  rule:
    enabled: true

mybatis-plus:
  tenant-enable: ture
  mapper-locations: classpath:/mapper/*Mapper.xml
  global-config:
    capitalMode: true
    banner: false
    db-config:
      id-type: auto
      select-strategy: not_empty
      insert-strategy: not_empty
      update-strategy: not_null
  type-handlers-package:  com.sie.mbm.mom.common.data.handler
  configuration:
    jdbc-type-for-null: 'null'
    call-setters-on-nulls: true

knife4j:
  enable: true
swagger:
  enabled: true
  title: MomX Swagger API
  license: Powered By PigX
  licenseUrl: https://MomX.com/
  terms-of-service-url: https://MomX.com/
  contact:
    email: test@gmail.com
    url: https://MomX.com/about.html
  authorization:
    name: oauth2
    auth-regex: ^.*$
    authorization-scope-list:
      - scope: server
        description: server all
    token-url-list:
      - http://${GATEWAY_HOST:admin-gateway}:${GATEWAY_PORT:9999}/auth/oauth/token

encode-key: 'momxmomxmomxmomx'

mom:
  mybatis:
    showSql: true
  pageinfo:
    mbm-max-select-size: 200
    dme-max-select-size: 1000
    dme-max-insert-size: 1000
    dme-max-update-size: 1000

security:
  oauth2:
    client:
      ignore-urls:
        - /css/**
        - /error
        - /actuator/**
        - /v2/api-docs
        - /ws/**
    resource:
      loadBalanced: true
      token-info-uri: http://admin-auth/oauth/check_token

rocketmq:
  name-server: 127.0.0.1:30754  # rocketmq地址
  producer:
    group: smt-mes-producer-group
    send-message-timeout: 3000
    retry-times-when-send-failed: 3
  consumer:
    group: smt-mes-consumer-group
    concurrency: 3
    max-reconsume-times: 3

hwmbm:
  domain: http://127.0.0.1:8080  # 华为MBM系统地址
  service: dynamic/api
  executeService: rdm/basic/api/customservice
  commonService: rdm/common/api
  subApp:
    - name: mdm
      url: imes/mdmService
    - name: wom
      url: imes/sfcService
    - name: ems
      url: imes/emsService
    - name: les
      url: imes/lesService
    - name: qms
      url: imes/qmsService
    - name: sfc
      url: imes/siteSfcService
1
2
3
4
5
6
7
8
9
10
11
12
13
14
15
16
17
18
19
20
21
22
23
24
25
26
27
28
29
30
31
32
33
34
35
36
37
38
39
40
41
42
43
44
45
46
47
48
49
50
51
52
53
54
55
56
57
58
59
60
61
62
63
64
65
66
67
68
69
70
71
72
73
74
75
76
77
78
79
80
81
82
83
84
85
86
87
88
89
90
91
92
93
94
95
96
97
98
99
100
101
102
103
104
105
106
107
108
109
110
111
112
113
114
115
116
117
118
119
120
121
122
123
124
125
126
127
128
129
130
131
132
133
134
135
136
137
138
139
140
141
142
143
144
145
146- 以SMT微服务为例,创建微服务配置文件
smt-mes-biz.yml
security:
  oauth2:
    client:
      client-id: ENC(LcjZms1vqs1po+G3mQk17g==)
      client-secret: ENC(LcjZms1vqs1po+G3mQk17g==)
      scope: server
      ignore-urls:
        - /error
        - /druid/**
        - /actuator/**
        - /v2/api-docs

spring:
  autoconfigure:
    exclude: org.springframework.cloud.gateway.config.GatewayAutoConfiguration,org.springframework.cloud.gateway.config.GatewayClassPathWarningAutoConfiguration

file:
  bucketName: sie # 华为云obs的桶名称
  oss:
    enable: true # 开启OSS 上传
    path-style-access: false #使用云OSS 需要关闭
    endpoint:
        obs.cn-south-4.myhuaweicloud.com  # 华为云obs地址
    access-key: 11111 # 华为云obs的AK
    secret-key: 11111 # 华为云obs的SK

logging:
  level:
    com.sie.mbm.mom.admin.upms.biz.mapper: debug

mom:
  tenant:
    column: tenant_id
    tables:
      - sys_user
      - sys_role
      - sys_menu
      - sys_dept
      - sys_log
      - sys_social_details
      - sys_dict
      - sys_dict_item
      - sys_public_param
      - sys_log
      - sys_file
      - sys_oauth_client_details
      - sys_post
      - sys_module
      - mes_import_sol
      - mes_import_sol_dtl
      - mes_prod_feed_station_list
      - mes_prod_feed_station_list_dtl
  api:
    api-source: class
    publish-type: private
    contextPath: /sie
    app-module: sie.site.smt
    permission-type: 3
    enabled: false

delegator:
  host: ${HUAWEI_API_URL:http://127.0.0.1}  # 华为MBM网关地址

#----------------DME config begin------------------------
application:
  appId: 111111111  # iDME应用ID
  tenantId: 1  # iDME租户ID

soa:
  token:
    url: https://iam.cn-north-4.myhuaweicloud.com/v3/auth/tokens  # iDME认证服务地址

delegate:
  subAppId: rdm_e3231ab62e9d4771bd0df793f62d2282_app  # iDME应用ID
  domain: http://1111.xdm.runtime.cn-north-4.huaweicloud-idme.com  # iDME内网或公网域名
  userName: sie  # iDME用户名
  password: 123456  # iDME密码
  endpoint: https://iam.cn-north-4.myhuaweicloud.com  # iDME认证服务地址
  domainName: siedme  # iDME主用户名
  regionName: cn-north-4  # iDME区域名称
  service: services/dynamic/api
  executeService: services/rdm/basic/api/customservice
  tenantId: -1  # iDME租户ID

smt_mes_topic: DEV_SIE_SMT_MES_TOPIC
smt_mes_consumer_group: dev-smt-mes-consumer-group
#----------------必填------------------------
store:
  dbType: dme

powerjob:
  worker:
    enabled: false
    akka-port: 27778  # akka 工作端口,可选,默认 27777
    app-name: mbm-mom-join1-smt  # 接入应用名称,用于分组隔离,推荐填写 本 Java 项目名称
    server-address: powerjob.mbm-common.svc.cluster.local:7700  # 调度服务器地址,IP:Port 或 域名,多值逗号分隔
    password: 123456  # 应用密码
    store-strategy: disk
    protocol: http
    max-result-length: 4096
    max-appended-wf-context-length: 4096
    allow-lazy-connect-server: false
1
2
3
4
5
6
7
8
9
10
11
12
13
14
15
16
17
18
19
20
21
22
23
24
25
26
27
28
29
30
31
32
33
34
35
36
37
38
39
40
41
42
43
44
45
46
47
48
49
50
51
52
53
54
55
56
57
58
59
60
61
62
63
64
65
66
67
68
69
70
71
72
73
74
75
76
77
78
79
80
81
82
83
84
85
86
87
88
89
90
91
92
93
94
95
96
97
98
99
100
101
102- 创建公共配置文件
# 4.2 服务配置
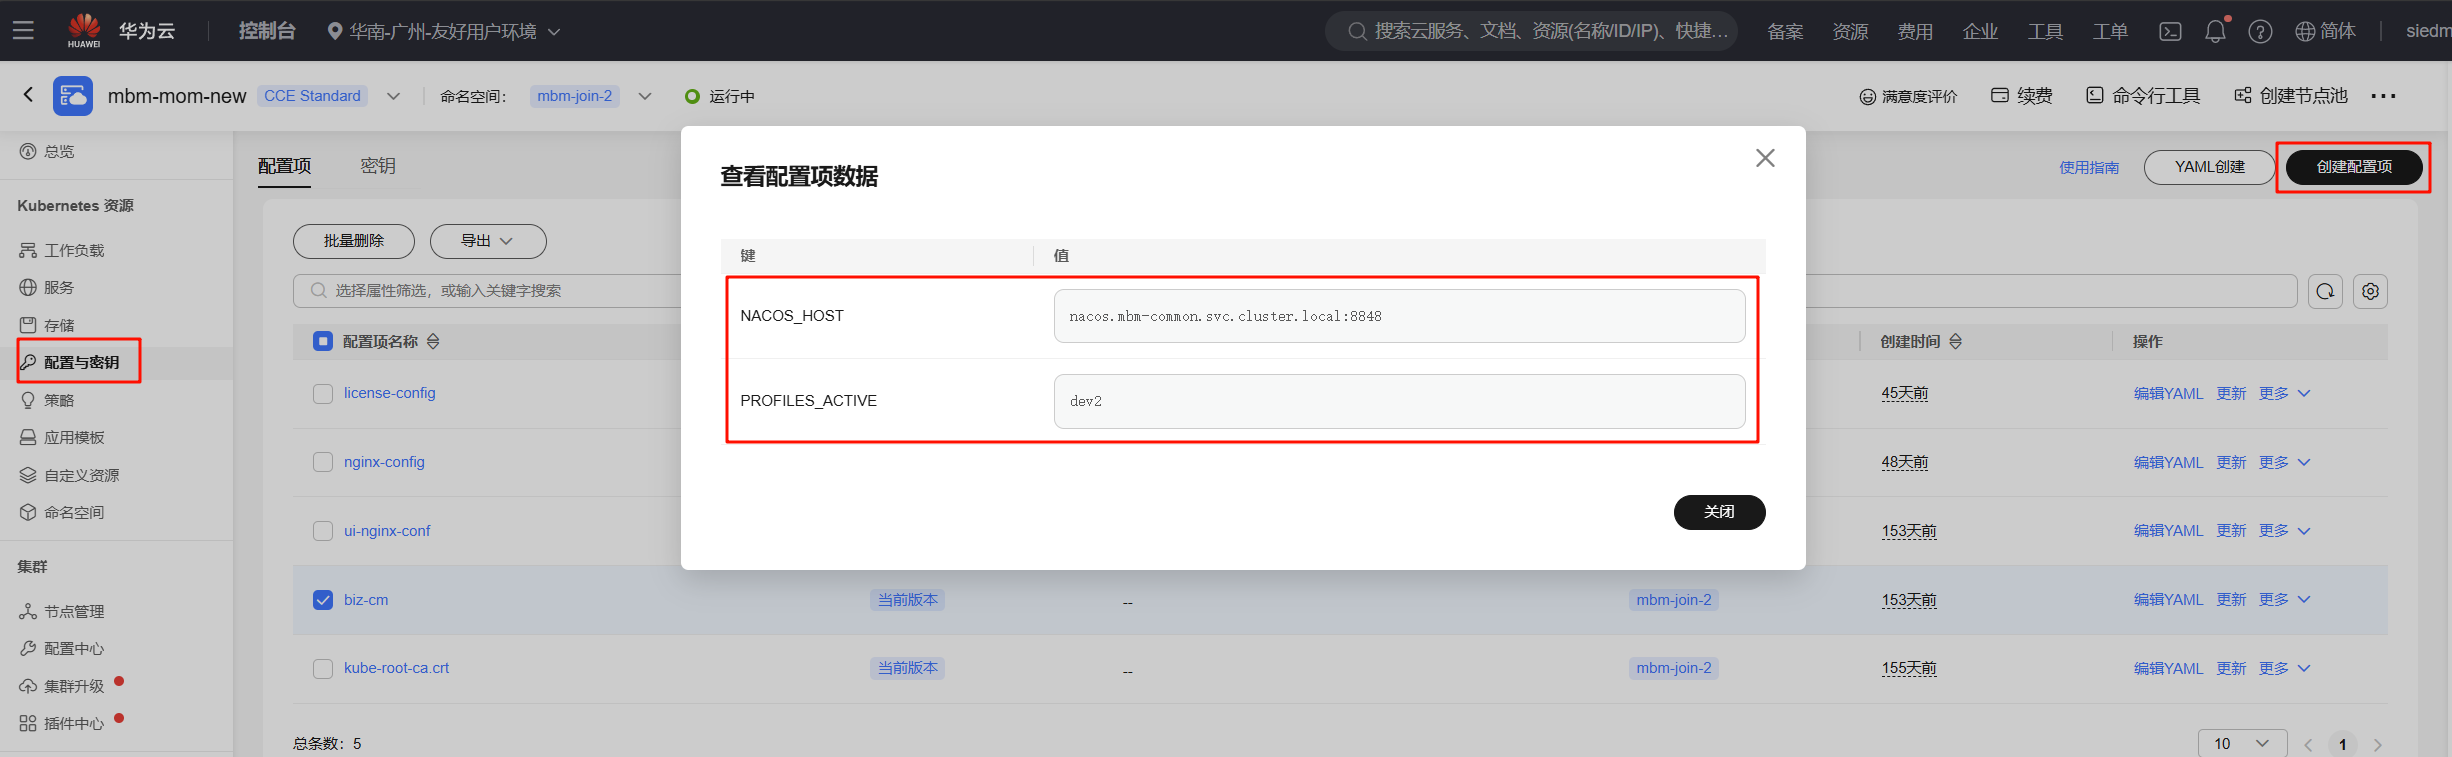
进入 CCE 控制台,在配置与密钥页面中,创建配置项,填入Nacos地址及环境标识
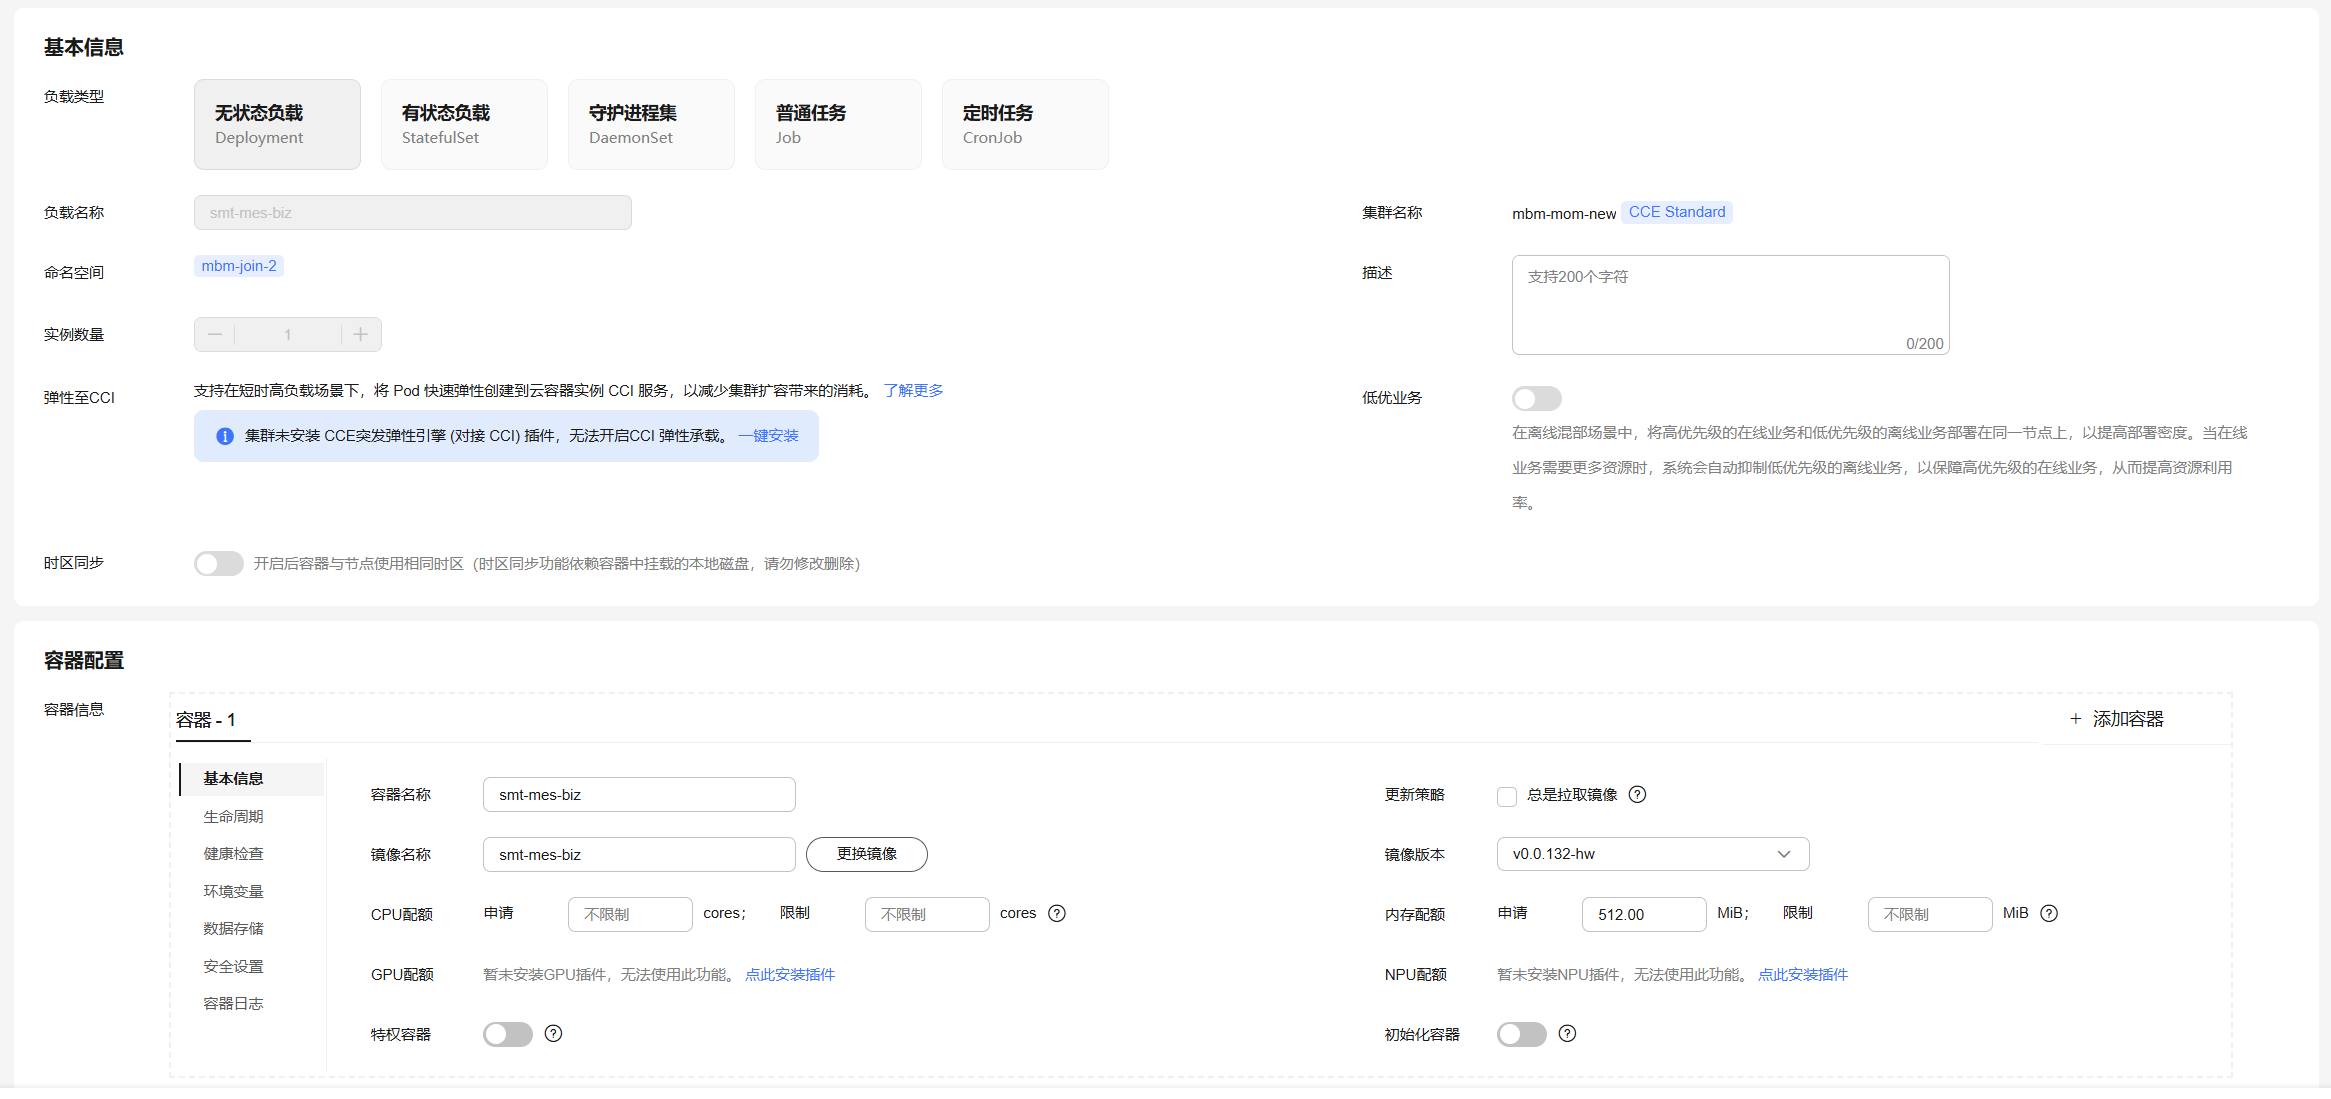
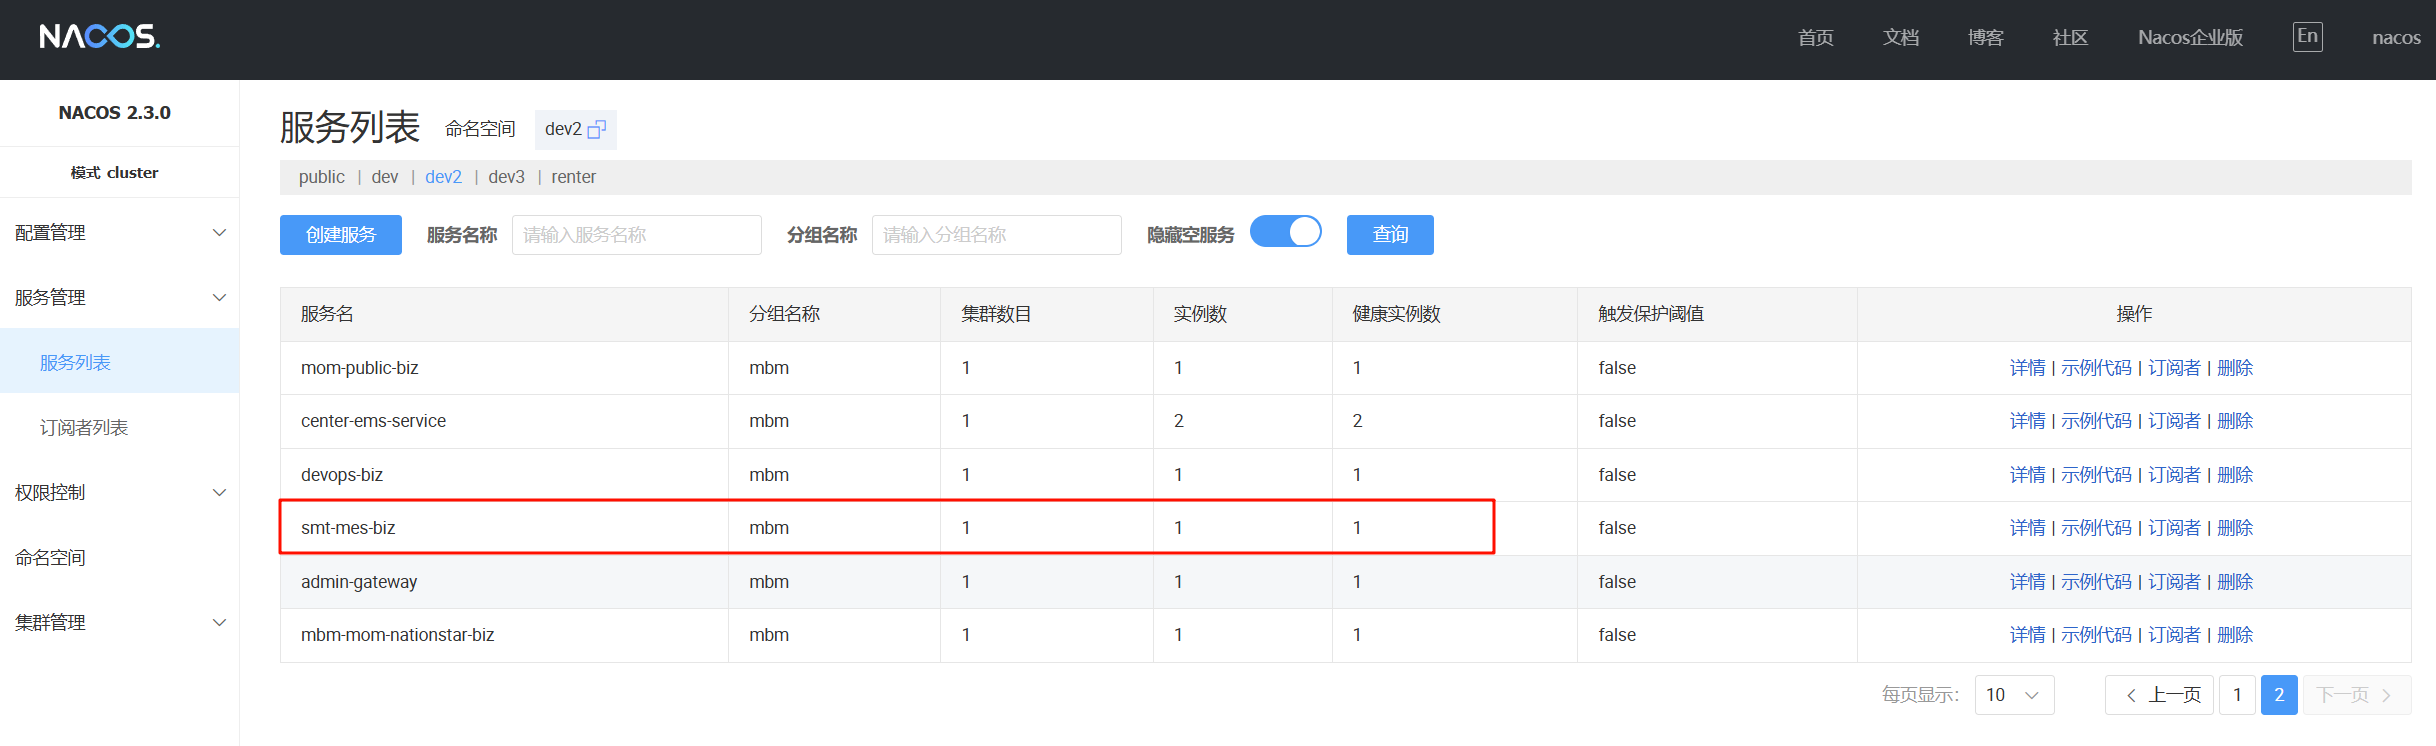
以SMT微服务为例,创建工作负载,容器配置如下图:
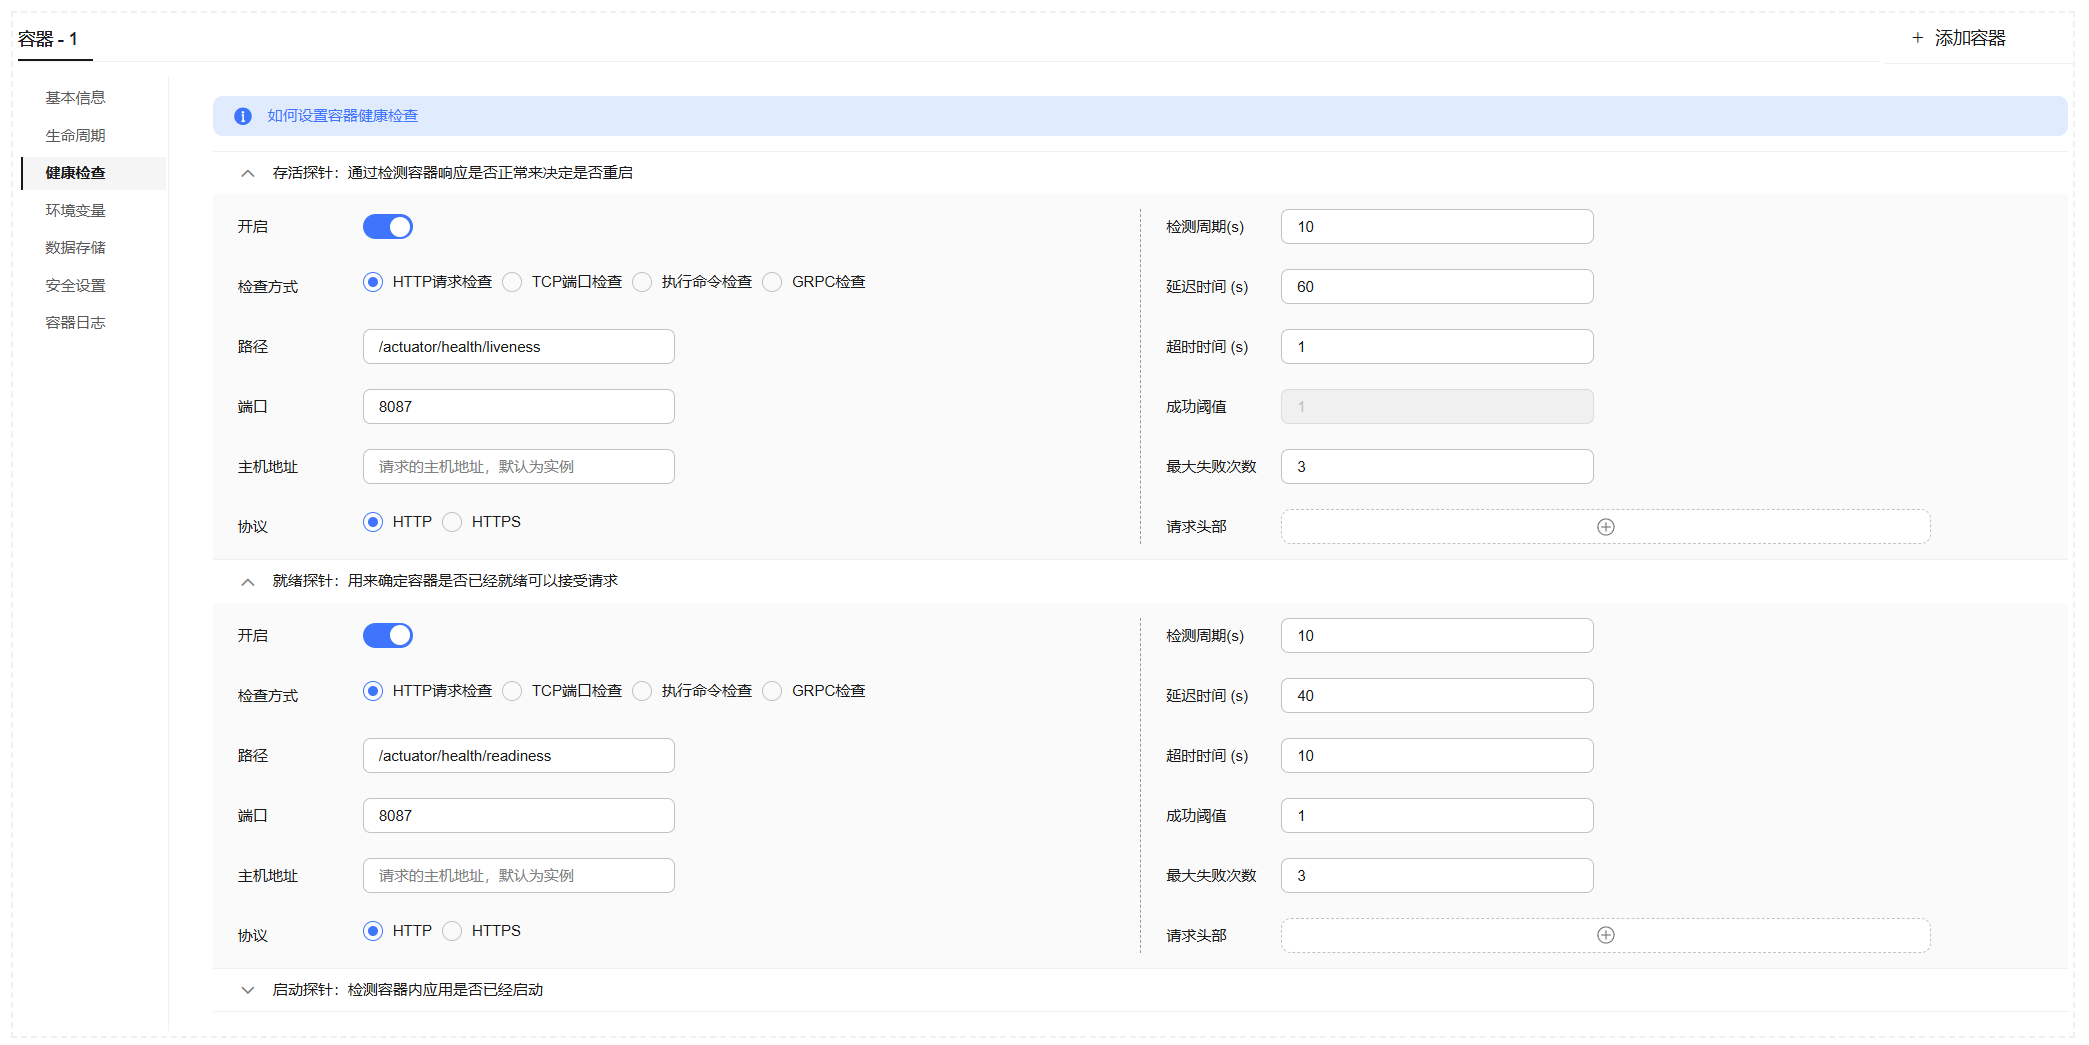
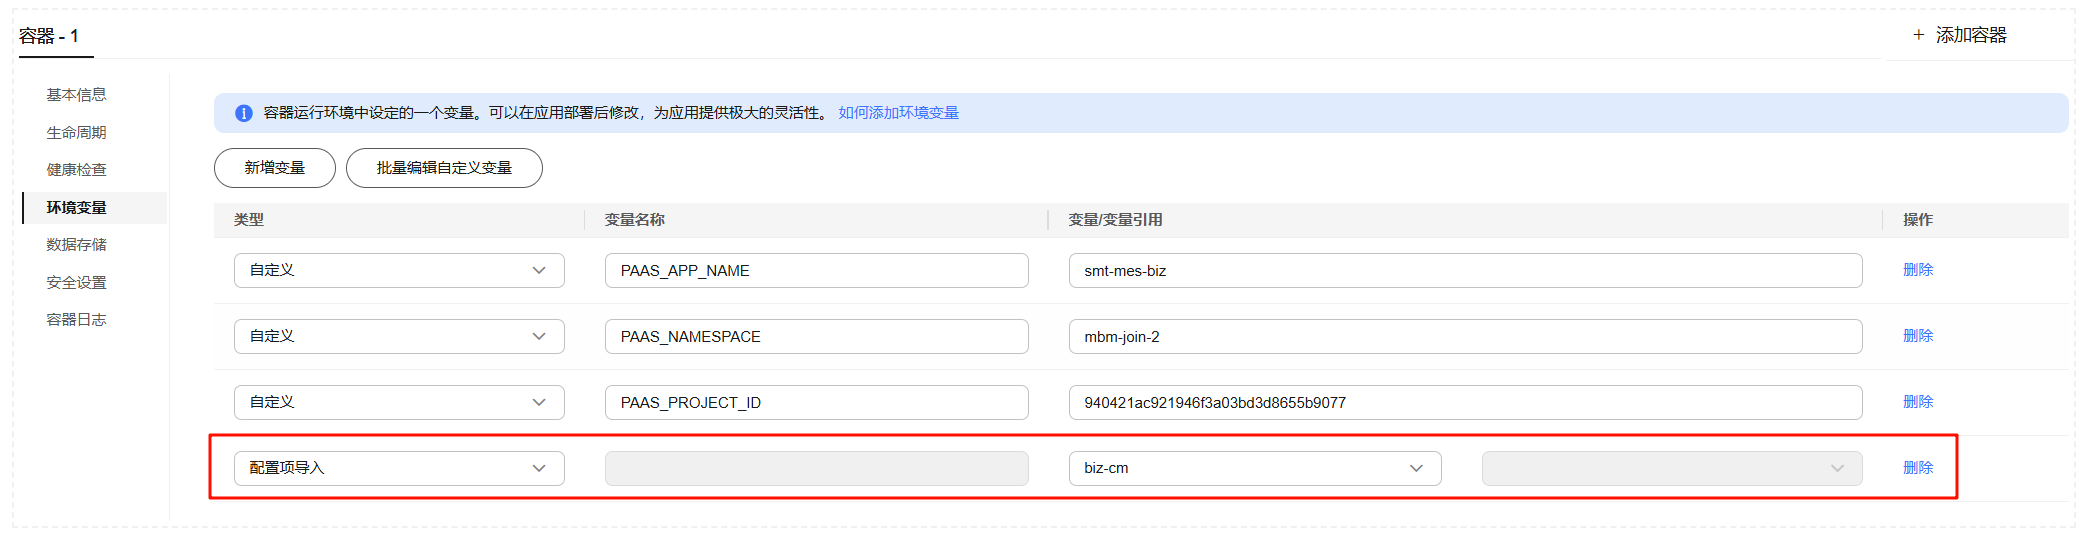
创建微服务对应服务,端口号依据为各服务内的
application.yml文件的server:port配置,服务类型选择集群内访问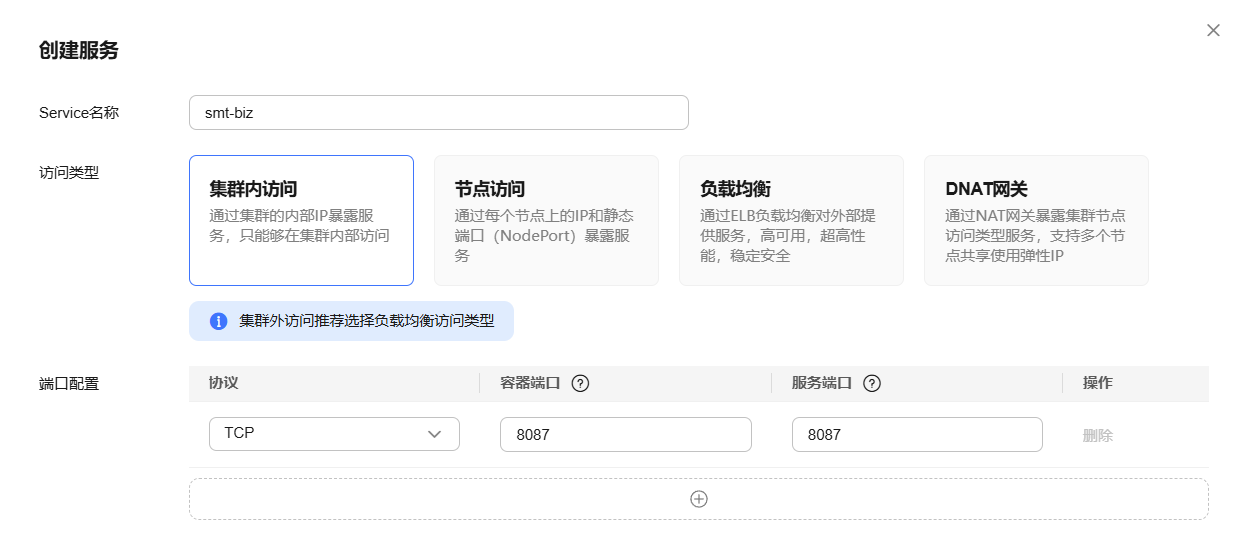
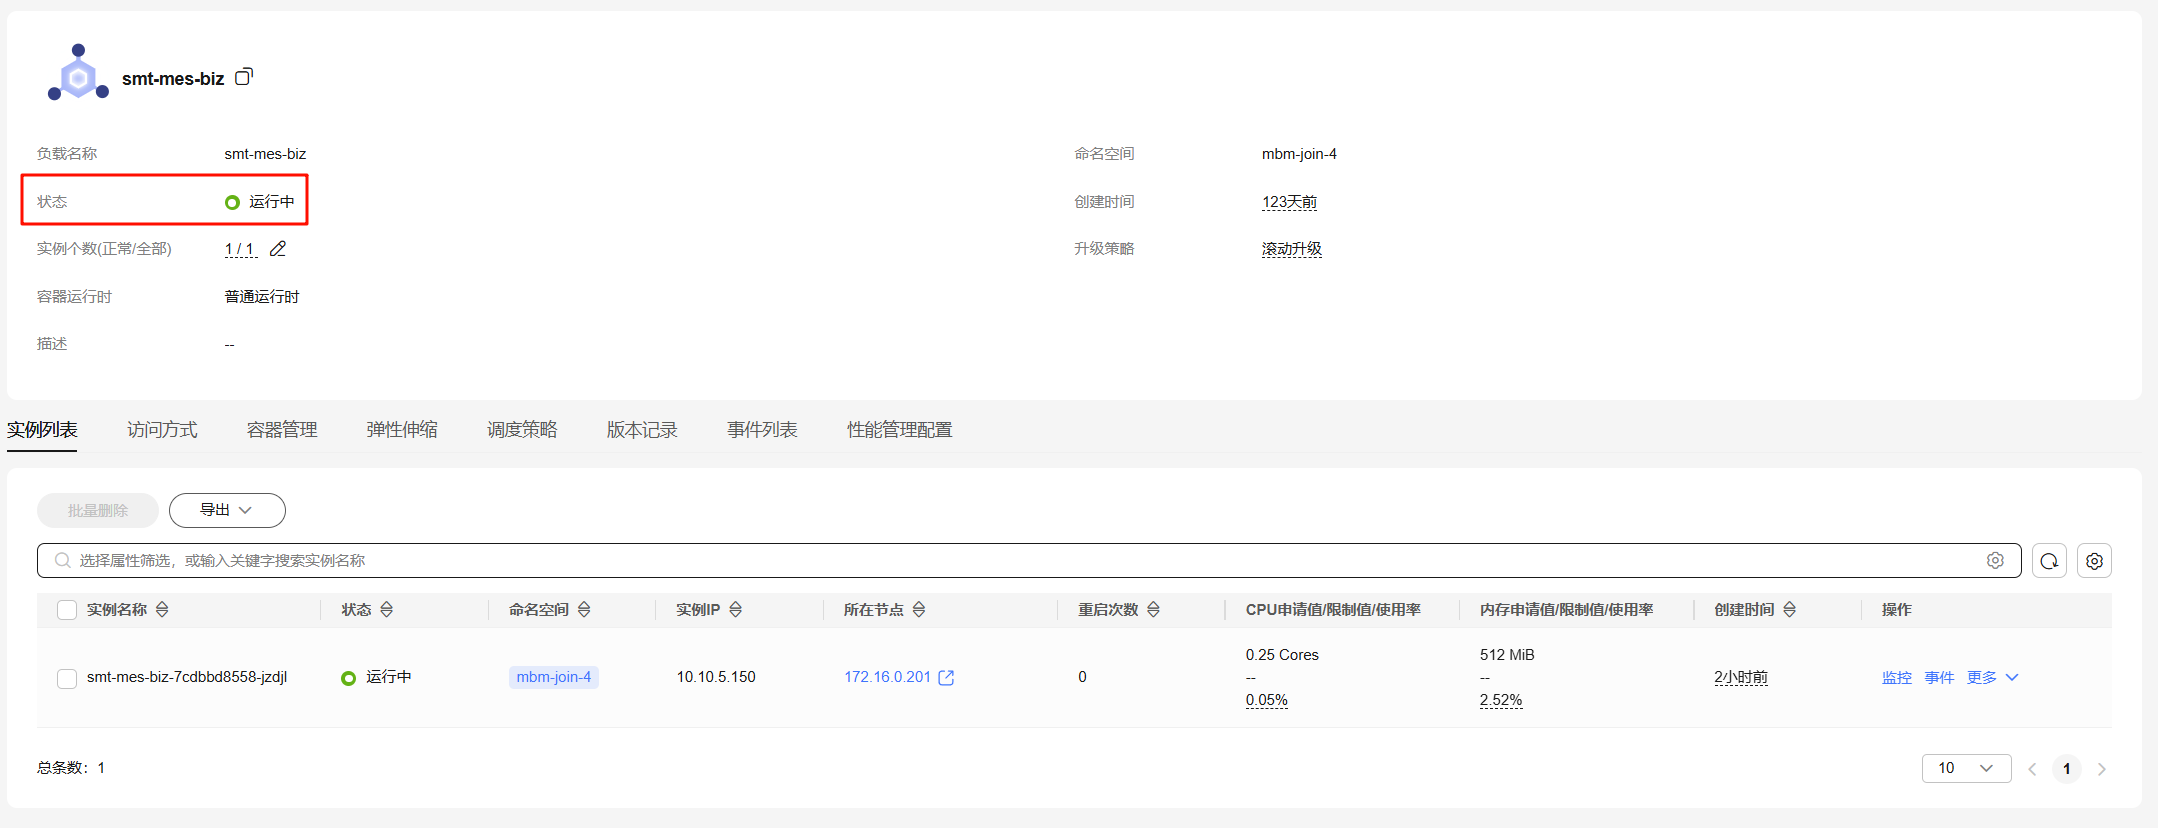
点击创建工作负载,等待大约1分钟观察是否创建成功及服务注册情况
# 5. 微前端部署
- 进入 CCE 控制台,在配置与密钥页面中,创建Nginx配置项,配置项键为
default.conf,修改代理的网关地址:
server {
    listen       80;
    listen  [::]:80;
    server_name  localhost;

    location /api/ {
        proxy_pass http://172.16.0.103:10888/api;  # 网关地址
        rewrite ^/api/(.*)$ /$1 break;  #重写
    }

    location / {
        root   /usr/share/nginx/html;
        try_files $uri $uri/ @router;
        index  index.html index.htm;
        if ($request_filename ~* .*\.(?:htm|html)$) {
          add_header Cache-Control "no-cache, no-store";
        }
        add_header Access-Control-Allow-Origin '*';
    }
    location @router {
        rewrite ^.*$ /index.html last;
    }

    error_page   500 502 503 504  /50x.html;
    location = /50x.html {
        root   /usr/share/nginx/html;
    }
}
1
2
3
4
5
6
7
8
9
10
11
12
13
14
15
16
17
18
19
20
21
22
23
24
25
26
27
28
2
3
4
5
6
7
8
9
10
11
12
13
14
15
16
17
18
19
20
21
22
23
24
25
26
27
28
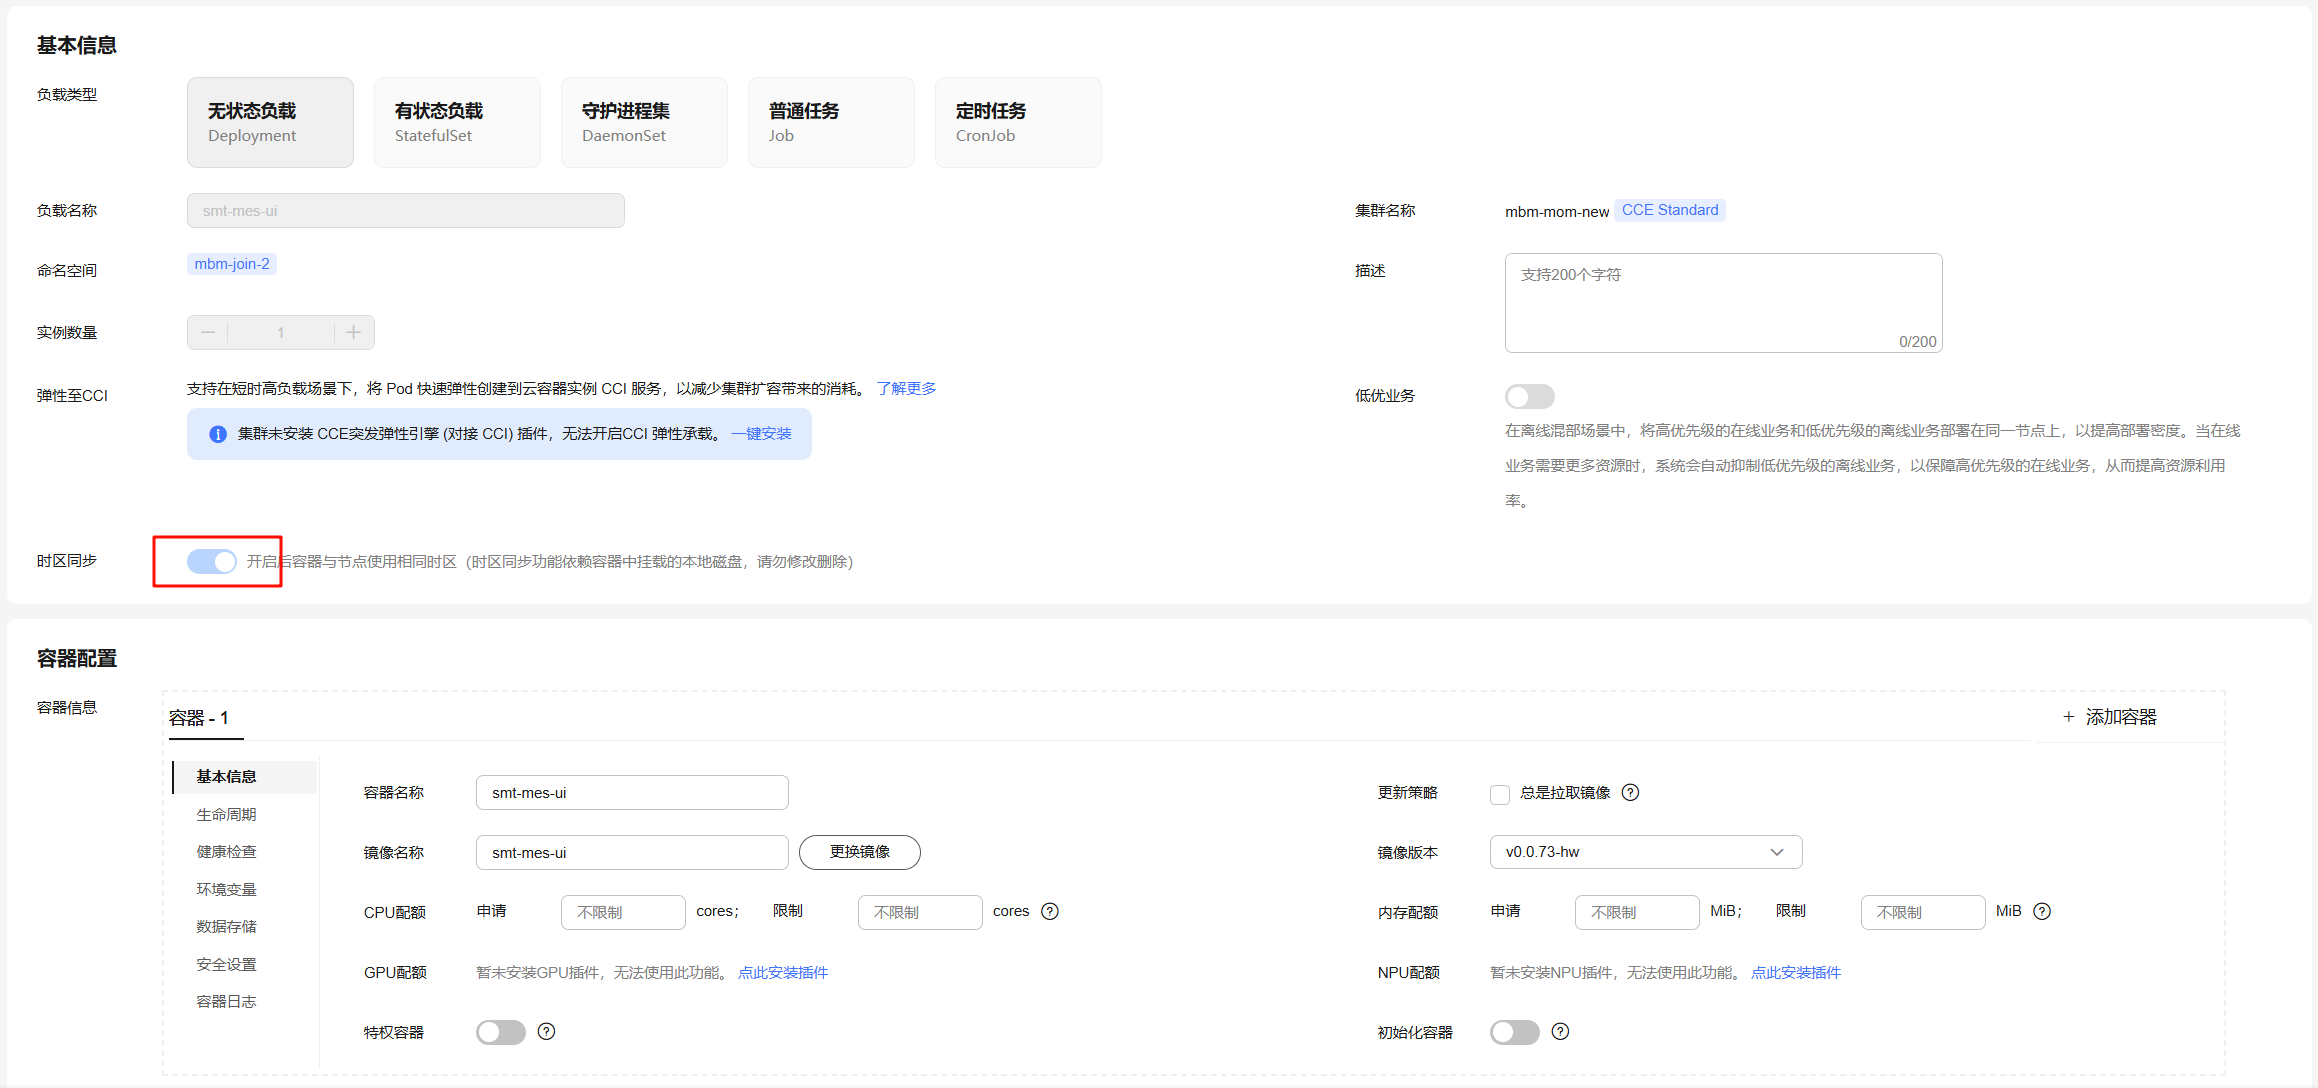
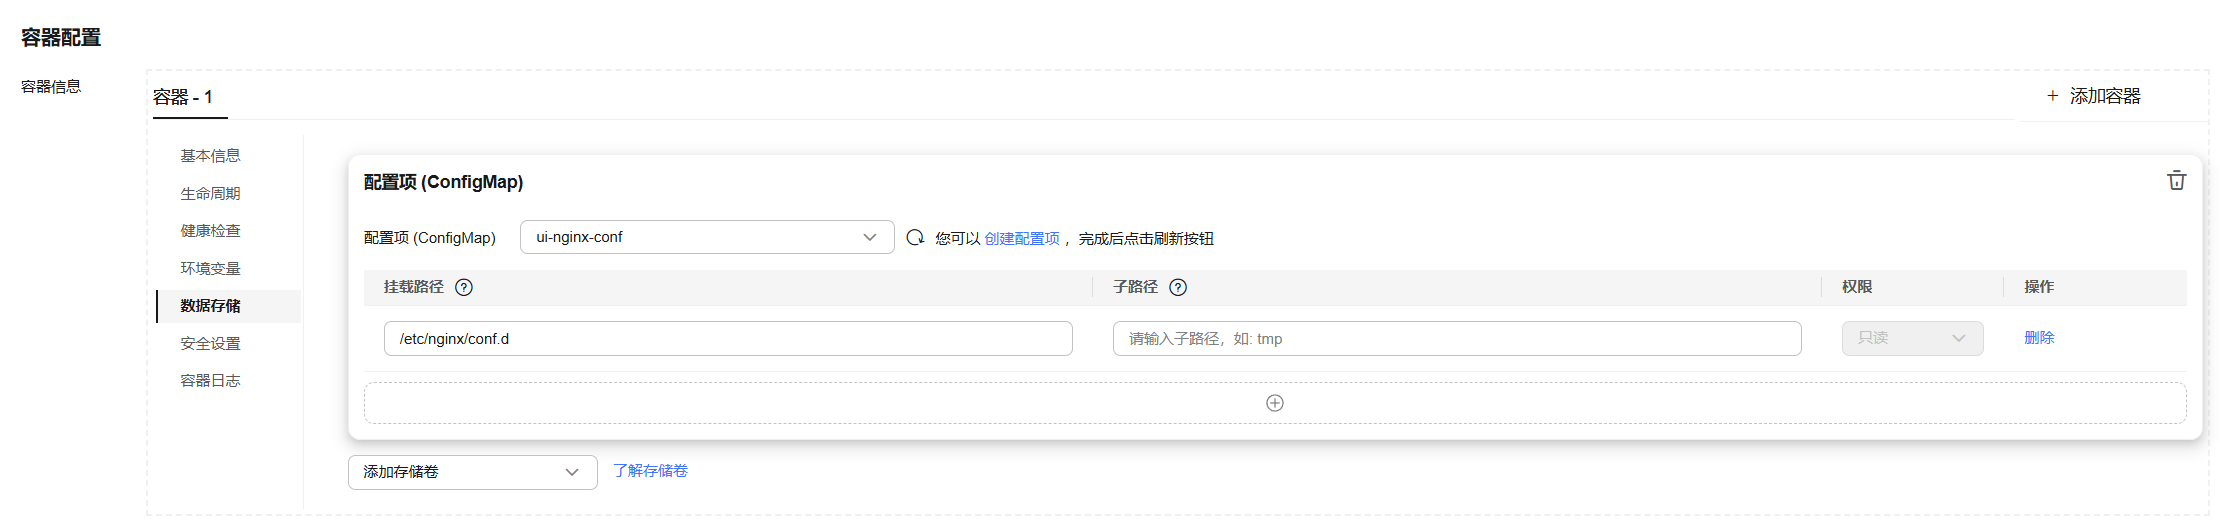
以SMT微前端为例,创建微前端工作负载,容器配置如下图:
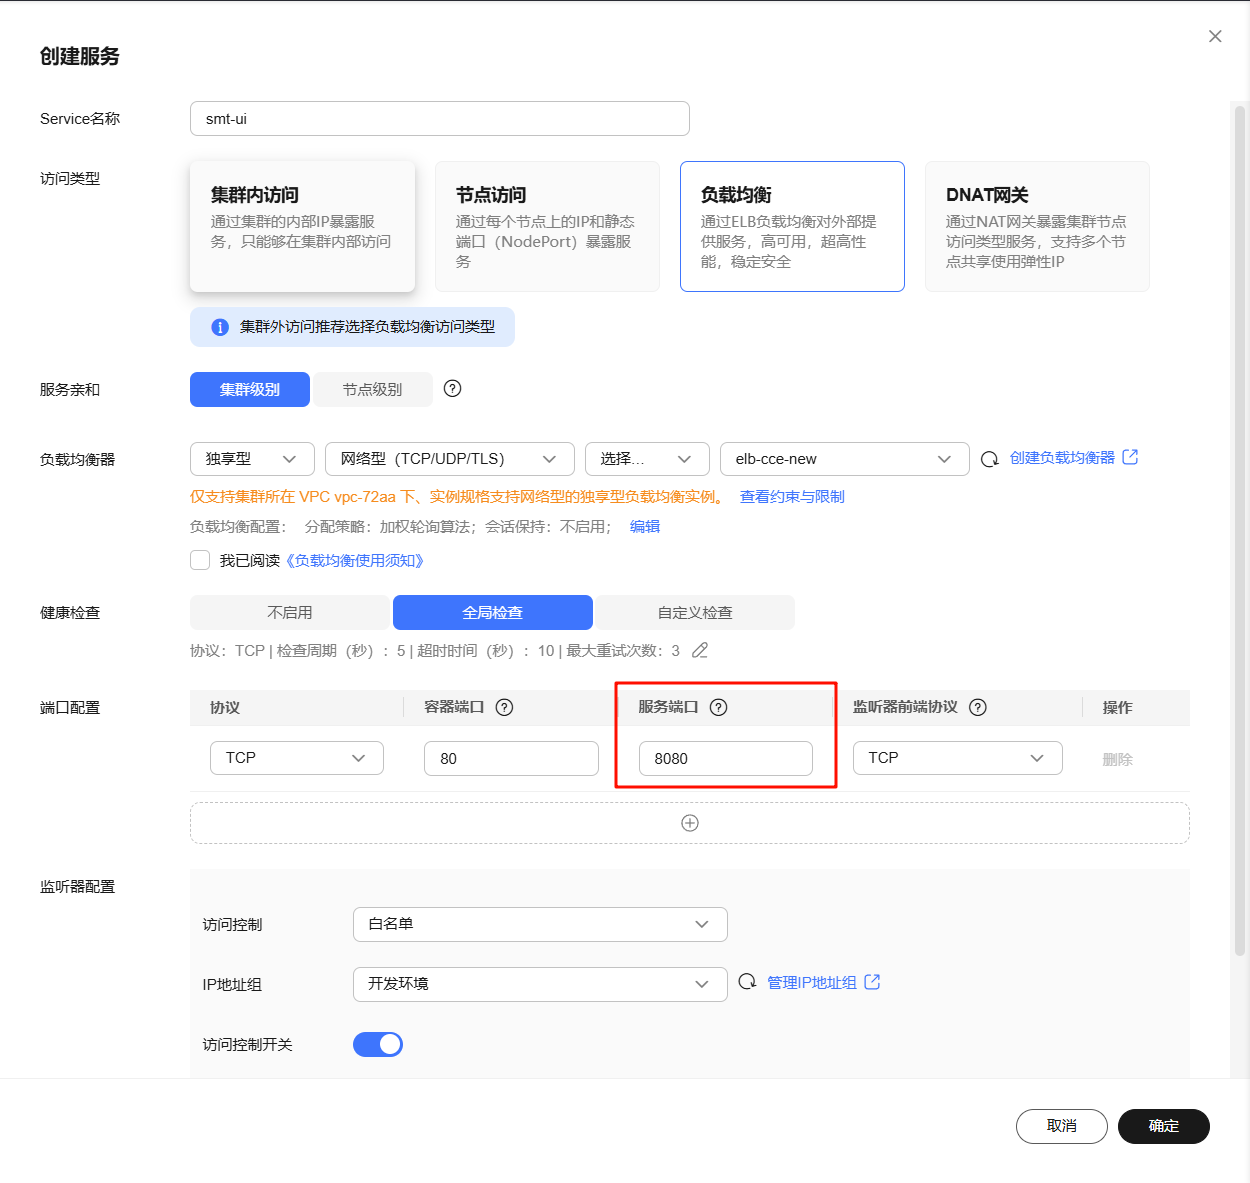
创建微前端对应服务,容器端口为80,服务类型选择负载均衡,需注意服务端口号不能与现有的ELB端口重复
点击创建工作负载,等待几秒观察是否创建成功
# 6. 网关部署
# 7. 环境管理
# 8. 监控与日志
# 9. 安全性措施
# 10. 发布与回滚策略
# 11. 故障处理与恢复
# 12. 常见问题与解决方案
# 13. 总结与最佳实践
在线编辑 (opens new window)